by Marci Blattenberger
|
by Marci Blattenberger |
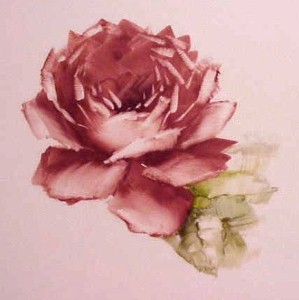
| Roses...Roses...Roses! I don't think there is any subject in china painting (except for portraits) that is as loved...or drives us as crazy! In this lesson, I am going to attempt to simplify a lot of the confusion surrounding how to cut rose petals. This lesson gives an example of rose cutting superimposed over the traditional "cup and saucer" drawing to help you see how the petals lie. To see a version of this lesson without the drawing underneath ( the deep pink rose at the top of this page), CLICK HERE. |
|
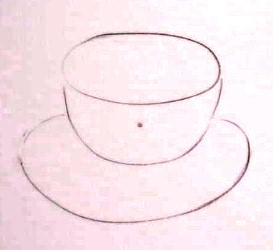 |
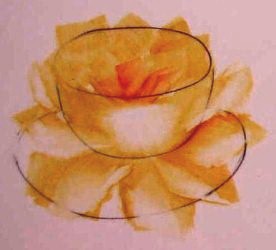
Traditionally, the full rose shape is taught as resembling a cup and saucer...and it is the easiest way to visualize the lay of the petals. The sketch at the left represents that, with the cup representing the bowl of the rose, the saucer representing the petals that have fallen away from the bowl and the dot in the center representing the place where the stem attaches to the bowl and is the spot where all the petals begin and end.( If you can visualize that all the petal edges need to end up at that stem point, it will help you place the petals.) |
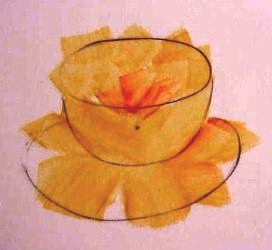 |
I like to start by painting in the curve of the bowl, then I turn the piece upside-down and quickly fluff in the top petals of the bowl, trying to leave the stroke edges irregular and jagged. Then I pick up a darker color on half of my brush (without cleaning it) and fluff in a darker heart of the bowl...I blot the paint off the brush and lightly soften where the top petals and the darker heart of the bowl meet. (don't over-do) Reload the brush with the darker color again ( this is also nice done with a light green) and make a comma stroke under one side of the bowl, starting about 2/3 up the side of the bowl and stopping short of the center of the bowl. (this will give you a shadow color under the bowl)...Reload brush with your main color and paint in the bottom petals... The uppermost petals should be slightly different in size and should start a little askew of each other. You want to avoid the look of "ears" or "a 2 handled cup". Also, avoid painting in rounded petal shapes. Make the petals angular. They will be far more interesting. |
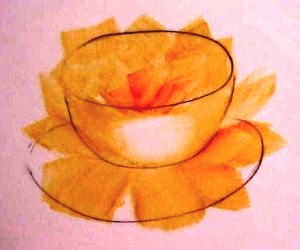 |
After painting in the bottom petals, I decided that I needed another set of petals starting a little higher. Note that I skewed those petals with the one on the right slightly lower but a little longer than the one on the left. The next step is to wipe out the bowl highlight. Some painters wipe out a highlight on one entire half of the bowl...but I think it helps to make the bowl look more rounded if you make your highlight in the center of the bowl ( and don't go totally to the bottom of the bowl either.) I do my wipeouts with turpentine, making sure that I have pressed most of the turp out of my brush so it doesn't run. The turp makes a nice, sharp highlight. I then re-oil my brush lightly, pressing out most of the oil and starting inside the wiped out highlight, I pull out a softening stroke on each side of the highlight. The effect I am after here is to 1. Soften the harsh edge where the wipeout ends and 2. create a middle value in that same area. The softening stroke creates a mid-value transition between the strong highlight and the darker paint that you are pulling into...and this is what helps create the illusion of dimension. |
 |
Next, I cut the uppermost side petals.....Again, the watchwords here are ANGULAR EDGES and VARIATION. When cutting the petals, avoid rounding the edges and make each petal a little different by slightly pushing or pulling on your brush as you lay it down to make the cut of the edge. This will give you interesting little ticks and nicks in the petal edges and nice little light paint build-ups on the petal edges. The left upper side petal shows how I cut a strong edge into the petal (turp on my brush). One thing that helps here is to "scoop" or shovel the brush instead of pulling it. Lay the brush slightly inside the petal edge and push the brush, like shoveling snow, toward the edge of the petal. Note that, if you were to draw an imaginary line from the side edges of the petals, the line would end up at that center point where the stem attaches. I cut both sides and then lightly oil my brush, pressing out all the excess...Then, just as you did with the bowl highlight, start with the brush inside the highlight and pull toward the bowl, softening the highlight edge and creating the mid-value on the petal. Apply a little more pressure to the bottom edge of the petal so that you create more mid-value on the bottom part of the petal, leaving more color at the top for shadows. You can see the softening I did on the upper right petal. |
 |
The rest of the bottom petals follow the same technique as the upper side petals...Sharp cut on the bottom edge with a dry turp brush using a shoveling motion, softening stroke with lightly oiled brush starting with the brush inside the highlight and applying more pressure to the bottom edge of the softening stroke. Keep in mind that the petals lay over each other like overlapping bricks (This is easier to see in the 2nd part of this lesson with the dark pink rose) |
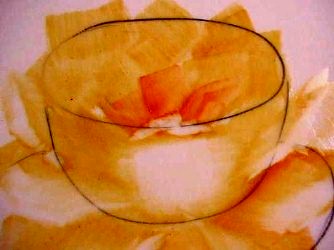 |
Next, we will tackle the bowl petals. Again, the thing that will lend interest to the bowl is little ticks and nicks...so again, in creating these petals, I use a brush with turp ( with most of the turp pressed out) and I use the shoveling/scooping motion again to cut little gashes. I start with a couple of little nicks at the center of the bowl...as shown at the left. |
 |
I continue the little shovel strokes, following around the rim of the bowl, changing the angle of the strokes as they go around the rim. Note that I pulled some strokes longer to make them appear to be little rolled and curled edges....and as I got to the top edges of the bowl, I again oiled by brush lightly and pulled some softening strokes out of the sharp cuts. Note that I didn't do this with all the strokes. I left most of them as just sharp ticks.... I then cut a few petals as an inside row in the bowl and cut a few in the heart of the bowl. |
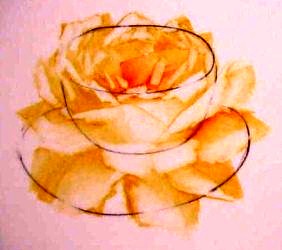 |
At this point, you can decide to pull another foreshortened petal or two across the bowl ....and this completes the first firing. Subsequent firings will add washes of color: light washes over the light areas, greyed-down washed to some of the middle value and shadow areas and deepening of shadows as needed. This will be covered in another lesson. I repainted this rose in a deep pink without the cup/saucer outline and it is easier to see the cuts in that step-by-step lesson....To see that lesson, Click Here: |
|
CLICK HERE to go back to the ON-LINE LESSONS PAGE CLICK HERE to go back to the PPIO HOME PAGE *on-line lessons and lesson pages are the property of PPIO and the contributing artists and may not be reproduced for distribution without permission from PPIO |