First Fire: Side load your brush into
a baby blue color and than into a pansy purple color.
The lightest color first, and than the darker color.
Variations of colors can be used. Like Pansy purple
and Ruby purple, and Medium rose and Ruby. All are
good combinations.
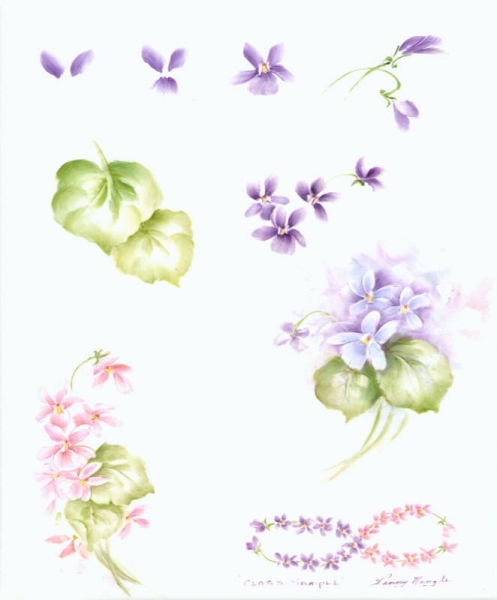
Making the Ears: Lay your brush down flat
and pull down at an angle towards the center from both
sides. Looks like a V. (See Study)
Chin: Turn your piece upside down, and
pull your side loaded brush up towards the center making
half moon shape between the bottom of the two ears.
Turn your piece right side up now, and finish the bottom
of the chin by pulling a bit of paint out to the bottom
edge of chin to fill in the area.
Arms: Side load, and put your brush down
flat, and pull towards the center between the ear, and
the chin on one side, and than the other. Try to keep
your arms from looking like they have a cast on both of
them ---/---, try painting a few like this / \ some
times too....
Center: Wipe out a ^ in the center with
your wipeout tool. The peak of the triangle is always
at the top between the ears. Place some yellow in the
center and a dot of pompadour at the peak of the triangle.
Now wipe out a ^ little line on each side of your yellow
triangle. You are now ready to fire that violet.
Making Three violets together:
You now have made one violet. In behind
each of the ear tips of your first violet place a triangle.
This will help you know where to place your other two
violets behind. Repeat the first steps, and don't paint
in a chin. Just use filtering strokes of ruby purple to
fill in that space in between. Use a wipe out tool
to wipe out the violet edges clean. Soften with a clean
brush.
Buds: Practice side loading your brush
with two colors, like baby blue and pansy purple, and
pulling your brush stroke flat towards a center point.
(See study) Make a stem line for yourself to paint towards.
Let the thumb side of the edge of your brush move towards
that center point. It takes a little practice, but before
long you'll say,* I've got it...!!
Tip: Put the violet study into
a plastic sheet, and practice placing your brush over
the petals and pulling your brush in the same direction
as is on your study. It will help you to get the feel
of the strokes.
Pink Violets:
I used Medium rose, and ruby colors. Same application
Colors for the leaves:
Chartreuse, and Moss green side loaded on your
brush. Shape to the center vein, and than shade from the
vein line out toward the edge. Shade your tip.
Wipe out your highlights with a brush or a wipe out tool.
Smooth out all wipe out tool marks made.
Now you too will love to paint violets.. Enjoy!
Penny Nangle
P.O. Box 24121
Indpls., IN 46224
Chinakidl@aol.com
|