|
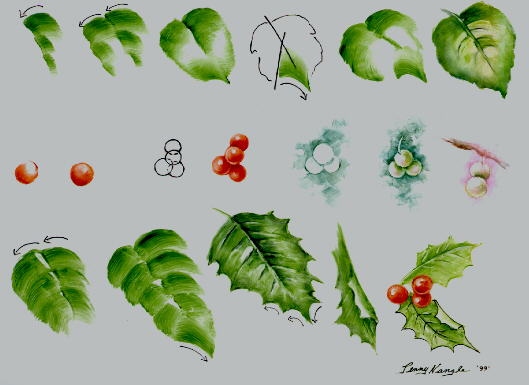
Now you are ready to place your brush down flat on the
china, (See Study) and pulling brush flat to the
vein line, and lift. The second stroke is half the
distance of the first, the third stroke is again half that
distance. You now have three strokes that look like stair
steps.
The other side of the leaf:Repeat
the stair steps, only this time you'll start at the vein
line, and pull brush flat to the outside of the leaf and lift.
Leaf Tip: (See Study) Side load
with color, and place your brush flat in a diagonal position
just above the tip end , and make a large comma stroke.
This will make your leaf tip automatically. Now, you just
pull from the inside edge of your leaf out to form the size
of the leaf you want......Fat, thin, etc. It seems to
look better if you do not pull your center vein line of
your leaf way to the end of your leaf tip, otherwise it
makes your leaf look cut in half. To finish off the smooth
look on your leaf you feather lightly the opposite way
of your original strokes.
Added highlights can be wiped out in the
leaves (see study) by wiping out windows with a wipe
out too, or silk on the end of your finger, smooth it
again with your brush.
Holly leaves:
Make
your strokes the same as a regular leaf, and just make
your strokes a little longer. Then use your wipe-out tool
to wipe out the curved in areas on the outside of the
holly leaf. Wipe out the vein lines or paint them in
either way is alright.
Red Holly Berries:
The berry that is on top is the first berry to paint.
Side load with a yellow red color, and place your color
only half way around the circle. (See study)
Side load again with yellow red, and place color right
behind the other circles around the main one on top.
This will make the other berries look like they are
behind the main one. Wipe out a highlight. You can
paint in a black dot in different spots on your red
berries on the last fire. (I forgot to show that.)
Snow Berries:
Use the same painting procedure as the Holly Berries,
just use a Blue green, or Chartreuse color instead.
Leave a lot of highlight.
Hope you have a fun time painting leaves and berries now
.....Penny Nangle
|