Hi all, I just love to paint these beautiful little delicate flowers.
The fragrance by my porch is great,although I do have trouble containing them.
This is not too difficult a flower for the beginning student to tackle.
|
Lily of the Valley a lesson by Penny Nangle |
|
|
Hi all, I just love to paint these beautiful little delicate flowers. The fragrance by my porch is great,although I do have trouble containing them. This is not too difficult a flower for the beginning student to tackle. |
|
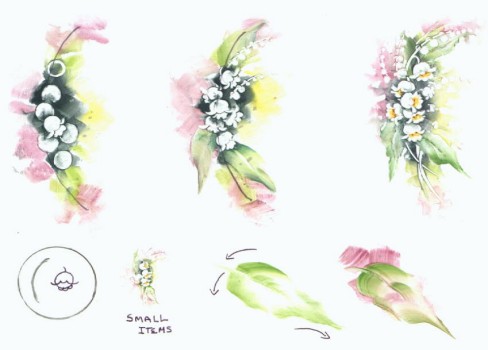
On a round, oval plate, box, etc. take your marking pencil and make a line following the design of the plate, Like a C. Now, right in the middle of the "C" area ,place a full load of Black Green paint( pretty dark). Place the strokes in blocks, (filter strokes) and don't smooth them out. On each end where you placed the black green, place some Chartreuse color in blocks (filter strokes again) don't smooth out. In front of the dark green, filter in a few strokes of yellow paint. You now have color in the middle, front, and both ends of the C. Now fill in the back, and beneath the chartreuse color, with medium rose filtered strokes. You are now ready to wipe out the flowers. Take a wipe out tool and make a circle right in the middle of the black green you painted in the middle of the C. (about pea size, on larger plate, and a bit smaller on a small box.) Make your second circle in back of the first, up to maybe five or so, putting every of the next ones in back of the first circle you made. You can make more, depending on how big the piece is. Wipe out the circles with a mix of 1/2 alcohol, and 1/2 of lavender oil. Make sure your brush is wiped dry when you wipe out, so as not to have any runs. Now, take your trusty wipe out tool and wipe out the little wings from the outside and up to the center, on each side of this circle. Wipe out a couple of little half circles on the bottom part of the circle of each flower. You can place some yellow inside each of the flowers, and then place a couple red dots just under the the lip of the flower, on top of the yellow you put there. For the leaves, Put two colors on your brush, (like yellow green, and shading green) and paint them in, right on top of the color you already have there. Wipe brush off after you do this, as you probably will pick up spme of the black green from the background. Add more color till you have formed a leaf. If you want to have some sprigs coming out of the top, use the wipe out tool and wipe out a curved line, and use your" stickey",(you can make one by putting a small piece of kneaded eraser on the end of a tooth pick) to press down under the line and it will make perfect little circles for your lily of the valley buds.To get different sizes of these little buds, vary the pressure on the "stickey".( You will need to re-shape the kneaded eraser from time to time .) China hugs, Pennyn Indy |
|
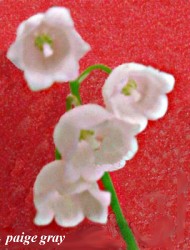
the real thing with thanks to Paige Gray for sending the photos. |
|

|
|
|
|
|
CLICK HERE to go back to the ON-LINE LESSONS PAGE CLICK HERE to go back to the PPIO HOME PAGE *on-line lessons and lesson pages are the property of PPIO and the contributing artists and may not be reproduced for distribution without permission from PPIO |
|
|
|
Page design by Marci Blattenberger for Porcelain Painters International Online |