TTTTTTTTTTTTTTTTTTTTTTTTT

SNOWFLAKE PLATE

by Marci Blattenberger

TTTTTTTTT

I am always looking around for something that is fun and easy and DIFFERENT!...so I found some intriguing new little "toys" that I call laser cut paper resist . They come in a lot of wonderful shapes and patterns ........hearts, lace strips, even inititals......but my absolute favorites are these adorable snowflakes. They ( and the other resist stickers that I carry ) can be found on my catalog page on PPIO and are a great , quick way to add a little extra dimension to a piece.

Note that you DONT have to use these resist papers to do this piece,( You can use a wipeout tool to wipe snowflakes out of the wet paint or you can add them on another fire with enamels, or base for gold but the stickers make it SOOOOOOOOOOOO EASY!!! J

Also included in a second lesson is another variation of the piece using lusters instead of china paints for a different look.

Materials:

  • one 8 or 9" rim plate
  • 3 or more sets of snowflake laser cut resist stickers (This particular sticker comes with 3 different snowflakes per sheet....On the lesson piece, which is a 9 inch plate, I used 4 sets of stickers )
  • china paint ( or luster)
  • Masking Fluid ( optional)

(If you choose, you can paint the inner area of the piece with masking fluid. This makes clean up a little easier but it not necessary.)

Peel the stickers carefully from their backing paper and position them around the rim of the plate. To make the snowflakes go further and also to enhance the design, I cut one snowflake out of each batch of 3 in half and then positioned the halves on either the inner or outer edge of the rim so that it appears that the flakes are falling off the edge.

The picture on the left shows a closeup of the placement of one set of snowflakes showing how I cut one of the flakes and positioned the 2 halves on the edge of the plate rim. When I do this, I also vary which snowflake I cut.

Make sure that all the little edges of the sticker are completely pressed to the china. I usually press the edges with my finger and then use the paper backing , which is a little slick, to rub the stickers down .

Once I make sure all of the stickers are securely in place, I painted over the rim with 3 different shades of blue....a light shade, a medium one and a darker one. I painted in patches of color and loosely blended them where they met but wasnt worried about blending out the brushstrokes.

I then lightly pounced over the color using a sponge....I purposely lightly pounced it so that the sponge left a bit of texture.

I then lightly pounced the piece with a piece of folded textured paper toweling which gave me the interesting marbled look you see in the closeup on the left. If texture is not your cut of tea, you can pounce or brush the paint smooth.

Make sure that the paint has gotten into all the little nooks and crannies in the stickers.

Remove the resist if you used it....If not, clean up the inside edge of the piece , straightening the edge . I also wrapped a tissue ( or silk) around my finger and wiped back a line of white around the outside rim of the plate. This makes a nice finished edge.

FIRING:

The firing directions are important! Make sure you read them.

DO NOT REMOVE THE STICKERS BEFORE FIRING! They are intended to burn away in the kiln.

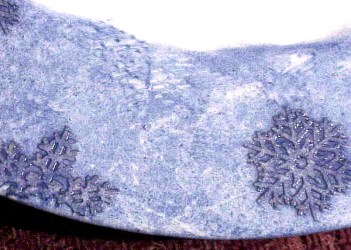
The paper will burn away , leaving a fine ash which you simply dust off or blow away. It will not fly around in the kiln so you dont have to worry about it getting on other pieces . I have fired pieces with the stickers along with a full kiln load of other pieces,including portraits and have never had a problem.

The one caution in firing is to make sure that you take gravity into account when you stack your piece in the kiln. The ash created by the paper burning off will not fly around the kiln but it will fall if the piece is placed so that it can fall. So you either have to fire a piece like this flat, so that the ash will stay in place or else , if you put it in a plate rack, position it so that the ash will fall either onto the kiln floor or onto a shelf where it can be vacuumed up.

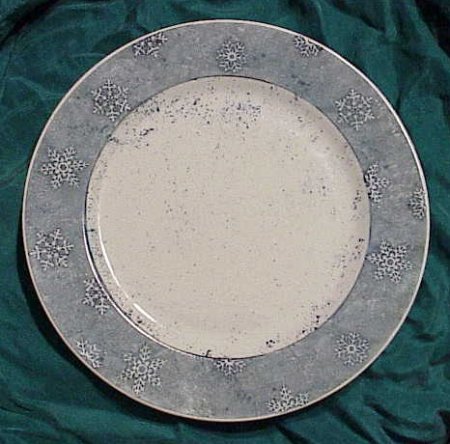
When I fired this piece, I was in a hurry to fire it and didnt think it out first, so I placed the plate in a plate rack as I normally would. When I opened the kiln after it had cooled, I discovered that the ash from the snowflakes at the top of the piece had fallen onto the bottom half of the plate, leaving little spots on the white part of the plate.... This left me with a dilemna: Whink off the spots or tapdance ( which is my name for having to come up with a creative solution to fixing a boo-boo!....Those of you who have seen my pother lessons know that I LOVE to "tapdance"...I get a LOT of practise , too , since my pieces rarely come out of the kiln looking like they did in my imagination when they were in the planning stages.
Fixing this particular boo-boo was easy. I simply mixed up a batch of the blue chinapaint with pen oil to an ink consistency.....then dipped an old toothbrush into the mixture and flicked more spots around the rest of the piece and refired.

CLICK HERE to go back to the ON-LINE LESSONS PAGE

CLICK HERE to go back to the PPIO HOME PAGE

*on-line lessons and lesson pages are the property of PPIO and the contributing artists and may not be reproduced for distribution without permission from PPIO