LEATHER LOOK
by Donna Kurtz
1831 Hampden Rd.
Flint, MI 48503
email Donna at dkmom@hotmail.com

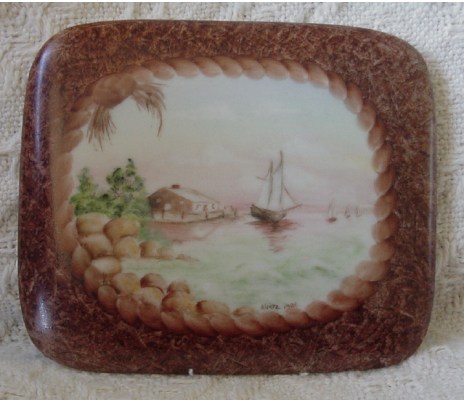
This study was done on a 3 1/2" x 4 1/4" covered box.

We will do the background first.

With wax pencil, mark off the area where the scene will be. Leather look painting can be done in a few different ways, but this piece was done in one fire.

I use a totally open medium, but a closed medium would be ok, if you work fast enough.

Paint the background area very heavily with rich brown. Crumple up a small square (about 8") of plastic wrap and use it to pounce over the painted area. Keep turning the plastic as you pat so that the creases are irregular.

When you are satisfied with the effect, clean out any paint that might have gotten on your scene area.

Now, with a # 8 square shader, side load with rich brown. Make small "C" strokes into the wet edge to simulate the rope design. You can turn the piece over and make another "C" stroke to round out the twists in the rope. In one corner, make a "knot" in the rope and some frayed ends.

If you are comfortable doing so, you can work on the scene now, or else fire and do the scene next time.
The bottom of the box was also done in the leather-look.

Different effects can be achieved using different colors. To create more depth, on a second fire you could add yellow brown and pad with the plastic wrap as before. Or use shades of blues and grays. Any color combination could be used to coordinate with the design you are putting in the "window".


CLICK HERE to go back to the ON-LINE LESSONS PAGE

CLICK HERE to go back to the PPIO HOME PAGE

*on-line lessons and lesson pages are the property of PPIO and the contributing artists and may not be reproduced for distribution without permission from PPIO