SMALL BOXES
using Luster, Raised Gold Structure and Dichroic Glass
by Marci Blattenberger
This is a fun technique that has endless variations... and its a GREAT way to rescue a piece that would otherwise be relegated to the Whink bucket. The boxes shown are both
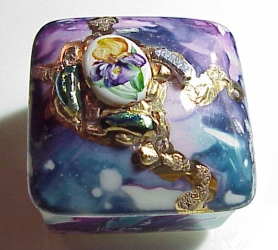
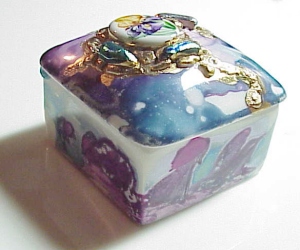
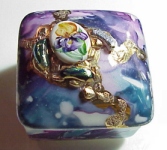
1 3/4" square. This particular lesson will cover the luster techniques, the structure and gold and the dichroic glass fusion
.
Like many of you, I had heard all of the "dont's" of luster work: (no dust, don't overlap your brushstrokes, don't work on a damp day, don't..don't ...don't)...... and like most of you, I developed a serious case of what Jean Beebe calls "LUSTER-PHOBIA" ......I was terrified to try them despite the fact that I am hopelessly addicted to their beautiful iridescence.
Then finally, I thought: "HECK! I can get cheap luster for about 3 bucks! I'm gonna be a big spender and try it out." So I loosened up the purse strings , bought a couple of lusters and proceeded to throw every rule I ever heard about lusters out the window..
Yes, its true my lusters don't look like the antique candy apple coverings they were intended to be, but I love the marbleized texture and the unusual color variations I get with my methods..... If you like something a little different, then you've come to the right place!

The technique for painting the iris on these boxes is already covered in the ONE-FIRE IRIS lesson...so I won't go back over it here.

SUPPLIES NEEDED:
*SMALL BOXES: readily available from most china suppliers
*2 OR 3 COLORS OF LUSTER : There are many very nice lusters on the market. The particular lusters I used on these pieces are Papilio brand lusters manufactured by Hemmi Gudmunson. They are slightly more pricey than standard lusters but the colors are incredibly vibrant and they are also stable at higher temperatures , so they are my luster of choice.
( Hemmi can be contacted via his website at http://www.papilio.com ....tell him Marci send you ! ...grin )
The box on the left uses Papilio "Lady Pink" and " Ruby" and the piece on the right uses Papilio " Green-blue" and "Royal Purple".
It isn't necessary to use Papilio brand lusters... there are many brands available from china dealers and ceramic shops. The most common brands are Hanovia and Med-Mar. Although Mother of Pearl , Aurora, Mardi Gras and other clear lusters with rainbow overtones are beautiful when applied to china, I don't recommend them for this technique.... You will get a better look if you use a couple of actual colors of luster....although you can add a coat of MOP to the fired lusters for an even prettier look. I also recommend sticking with colors that blend well, like blues , pinks and purples which can all be mixed nicely, blues and greens, oranges and reds , oranges and greens.....altho you can sometimes mix odd combinations and end up with a surprisingly beautiful piece if you are willing to take a chance.....( the good news is that luster doesn't fuse with the surface of the china like our paints do, so they are pretty easy to remove with Whink if you're not pleased with the look)
*BLUE MASKING FLUID: (optional but very helpful) This is a special masking fluid that can be obtained from me by either emailing me at rxguitar@comcast.net or by checking my catalog on the PPIO catalog page ( Marci Blattenberger). The difference between this and other masking fluids is that it the only masking fluid that easily peels off of bisque...and when you are working with run-luster techniques, it saves a lot of clean up time ( and keeps the lusters from spotting up the bisque box edges, which is impossible to remove .)
*DISPERSING FLUID: Dispersing fluid is a clear liquid that thins the luster and helps it to flow across the piece and marbleize with the other colors. It can be obtained through china suppliers.
*SPRAY CLEANER: This is used to create extra textures in the luster and many products will work: "glass cleaners" (ammonia-based cleaners), "Fantastik", "Dow Bathroom cleaner" (but NOT the "scrubbing bubbles" one )etc....
*JEAN BEEBE'S STRUCTURE PASTE or BASE FOR GOLD or I-RELIEF POWDER: Don't confuse this with the yellow raised paste or white enamel. The ones I'm talking about are all white powders that produce a raised texture after firing. They are very similar ... most of the difference is in the look of the final product:
I have been using Jean Beebe"s structure paste lately because it mixes with water so it doesn't smoke when you fire it, it breaks up into interesting little nuggety textures after firing and , most importantly, it fires matt so that when you put Liquid Bright Gold over the top of the fired paste, the gold fires to a soft Roman gold -like look....very rich!
Base for gold and I-relief both are mixed with oil, so you have to be very careful when you fire the kiln so that you vent out the smoke....( VERY IMPORTANT: If you fire this in a very small jewelry kiln, because of the amount of oil used, it CAN set itself on fire.. (BEEN there!) It won't hurt the kiln...the soot will burn off ..but it WILL give you a heart attack....so be aware and VENT WELL)... You can probably mix them with water instead of oil but I haven't had much luck trying that......so I have mostly been using Jean's structure lately.
Base for Gold ( DON'T say "raised base "when talking to a dealer because you will likely end up with the yellow raised paste...)and I-relief can be obtained from most china suppliers.....Jean Beebe's Structure Paste can be obtained directly from Jean herself by emailing her at Beebe@wave.net or by checking her catalog on the PPIO catalog page ( Jean Beebe Studio)

*DICHROIC GLASS, FUSIBLE GLASS or STAINED GLASS BITS: first, a word about Dichroic glass ( DIE-CROW-ICK) : It is a specialty glass that was originally manufactured for NASA for the space shuttle. It is made by spraying special chemicals over the surface of fusible glass, then spinning the glass sheet in a vacuum chamber while passing an electric current over it. There are very few manufacturers making this specialty product and it IS pricey....but the look of this glass after firing is so spectacular that it justifies the cost. ( It only takes a very small bit...smaller than a pencil tip eraser, to make an impact on a piece.)It can be obtained from me by either emailing me at rxguitar@comcast.net or checking my catalog page on PPIO : http:www.porcelainpainters.com.
Fusible Glass is also a specialty glass
that can sometimes be found at local stained glass shops. It can sometimes be found with an iridescent coating that can be fired. (Most of the iridescent coatings on regular stained glass will burn away in the kiln ... but Bullseye carries a line called Irridized Fusible that holds the iridized surface even after firing. Its not as flashy or spectacular looking as dichroic glass but is still dazzling.

*JEWELRY DISK or HANDFORMED PORCELAIN PIECE or SMALL BROKEN PIECE OF PORCELAIN:
*LIQUID BRIGHT GOLD:

MASKING OFF THE BOX: Cover the raw bisque edges of the box and the box bottom with several coats of the Blue masking Fluid, ( use at least 3 thin coats on the bisque edges of the box ....this is an optional step but saves a lot of trouble later. It makes clean up of the box a snap! )It dries fairly quickly but works better if you apply a thin coat, let that dry, apply the next coat, etc...until you see a definite blue color. When it is dry to the touch, you are ready to begin the next step:
MARBLEIZING THE LUSTERS: Before I get into how I marbleize the lusters in detail, we need to talk a little about lusters. First: It is VERY IMPORTANT that you take care NOT to CROSS-CONTAMINATE the luster bottles. That means that you have to be very aware of not dipping your brush, eye-dropper or cotton swab into one luster bottle and then into another bottle. (If you do use the same brush, you have to make sure that you have cleaned EVERY trace of the other luster out of it) Its also a good idea to label the bottle lids too so you don't accidentally put the wrong lid on the wrong bottle. The reason for this is that, while some lusters can be mixed together while wet with spectacular results, some lusters when mixed together wet turn into "poo-poo".....Yes, we are gonna be mixing luster colors together on the boxes and yes, there may be some areas where the results are not pleasant but these will either be small areas which won't be that noticeable or else they can be covered over with Liquid Bright Gold which is opaque .... There is a BIG difference between having a small area of ugly color on a box and having a WHOLE expensive bottle of it! So be careful not to contaminate your luster bottles.
Another thing to remember about lusters is that they are all basically the SAME COLOR before firing. They are metallic salts in a suspension
and are generally orange, yellow or brownish-black....so there is no way to tell what the piece will look like till after firing. (Opening the kiln is like Christmas morning..........grin!) (Of course, the surprise isn't always a happy one.... but a little creative tap-dancing with structure and gold can cover a multitude of sins.....and if worse comes to worse, luster Whinks off very easily! )

Another VERY IMPORTANT point to remember is that LUSTERS DRY VERY QUICKLY so this means you have to work fast. Get everything you need for the marbleizing ready so you don't have to look for anything.(lusters, applicators, dispersing fluid, eye-dropper for dispersing fluid, spray cleaner and a hair dryer)

ONE MORE VERY IMPORTANT NOTE: Lusters and dispersing fluid are very volatile and the fumes will give you a NASTY headache if you're working with them for a while or in a small area....so make sure that you have PLENTY OF GOOD VENTILATION. At least a fan blowing the fumes away from you........

OK! HERE WE GO!
Hemmi's Papilio lusters come with handy glass eyedroppers that are perfect for dispensing the lusters...but I also keep a supply of cotton swabs (Q-Tips) on hand to spread the lusters onto the piece. If you don't have eye droppers for the lusters, you can use a brush, but I just use the Q-Tips unless I'm covering a very large area. I pull a little of the cotton from the tip so it doesn't soak up and waste a lot of luster.
I dip my Q-tip in the first luster color and apply patches of it in different areas of the box lid and box bottom, working quickly. I discard that Q-tip , pick up a new one, dip into the next color and apply patches of THAT color to the lid and bottom....This can be repeated with a third color, if desired. I make sure that I leave some white areas of the china between the patches of color and I try not to mix the wet colors with the Q-tip.
Then , working quickly over several thicknesses of newspaper, I dribble on some dispersing fluid. You will see the colors thin and run into each other. At this point, you can blow on them with your breath to move them around and/or add more dispersing fluid or more luster> Don't OVERDO the luster. There will be very sheer areas of luster on the box that you might think wont be very colorful but, trust me: these will fire with color......Check the luster for areas of buildup and either blot gently with a tissue or use a little more dispersing fluid in these areas...If the luster is on thick, it will burn off, leaving a powdery ash on the china and no color...The luster SHOULD be a THIN coating..

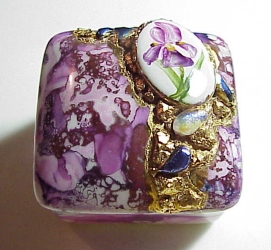
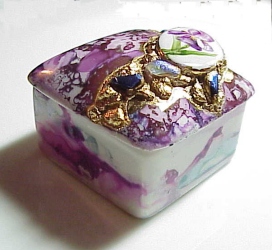
In the picture on the left, you can see how the two lusters have mixed .This box is the Papilio "Lady Pink" and "Ruby" but one shows up as yellow and the other is amber colored before firing. NOTICE the small white spots in the lusters....this can be seen really well in the large amber area just under the white jewelry porcelain. These spots are caused by spraying the still-wet lusters with the cleaning spray. The cleaning sprays work through the luster right down to the white china and it makes an interesting effect.
To get the right effect here, the idea is to just catch small droplets of the spray and you have to do this while the lusters are still wet. I hold the piece at arms length away from myself and then spray the spray cleaner into the air and let the fine droplets fall onto the piece....It may take a few seconds for the effect to happen, so watch it carefully and be ready with the hairdryer to dry it to stop the process or else the spray cleaner will eat away too much of the luster. Be careful to just catch the droplets and to not spray a stream of cleaner onto the luster ..too much cleaner will wash all the luster away.

You can fire the piece at this point, if you want..... or you can keep going.(Directions for firing are a little further in this lesson......but remember to pull off the resist before firing.)

MIXING THE STRUCTURE, APPLYING THE PORCELAIN AND GLASS:
If you decide to continue, mix up a batch of Jean Beebe's structure with powdered milk according to the package directions. Pour out about a tablespoonful onto a tile and mix with water added a little at a time until it is fluffy and the consistency of whipped cream. Spread it from the edge of your palette knife in an interesting pattern on the box lid, concentrating a larger area of it where you want to fuse your jewelry porcelain or free-form and the glass bits.

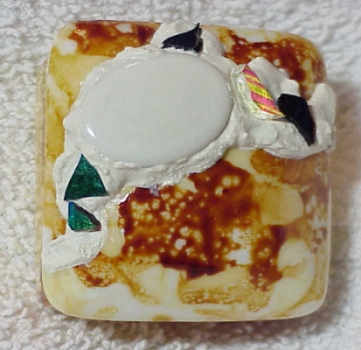
(If you use the base for gold, mix with any oil you have handy and follow the same directions for application as with BB's Structure...but please RE-READ the CAUTIONS about firing this because of the high oil content.)
Place a jewelry porcelain into the structure and press it down a little to seat it....then add bits of dichroic or stained glass to the structure.(I break my glass with either a glass cutter and breaking pliers or with a hammer. You can also break it by heating it and then dropping it into ice water.)
Again, you can stop at this point and fire the piece.....or you can continue and paint the jewelry porcelain. (You can also paint the porcelain BEFORE you stick it in the structure.. or you can wait till after you fire the structure to paint the little jewelry porcelain...The choice is up to you. (The structure and the dichroic glass will hold up to multiple firings.)
Let me backtrack a little here to talk about fusing the jewelry porcelain or free-form to the box: Sometimes you will discover that a box you want to fuse a porcelain to is very convex and when you set the jewelry porcelain on it, there will be a gap between the edge of the porcelain and the box. To fix that, simply frost a gob of structure down where you want to put the porcelain piece, place the porcelain piece into the structure, press it down lightly to seat it , add the bits of glass and fire. When you open the kiln, you may get lucky and find that the structure has covered the gap...but more likely you will find that the structure has done what it's intended to do and has shrunk back leaving what looks like small caves around the porcelain edge. NO PROBLEM! Just put more structure over the gaps to fill them in and refire....(If the gap is very large , you may have to do this several times)

FIRING:
Make sure you have removed the resist from the box before firing...................

It is generally recommended to fire lusters at coolers temps, like 018...but never being one to let a rule stop me, I began firing my luster pieces at a hot 015 fire. I discovered that this hotter fire gave me a wonderful shine and a more durable luster..(It does change the colors of some of the more delicate lusters so you might want to test fire them first if you are looking for a specific color.
The last step is to cover the structure with Liquid Bright Gold and refire to an 015. ( depending on the quality of the gold, you might need 2 coats, fired in between each coat.

.These boxes can be stopped and fired at any point in the process, depending on how brave you are! I generally try to finish as much as I can in a single firing..so a typical box for me is:
1. resist the edges
2. do the luster effects
3. frost on the structure paste
4. seat the jewelry porcelain in the structure
5. stud with dichroic glass
6. paint the jewelry porcelain
FIRE 015

7. Liquid Bright Gold over the structure
FIRE 015.

(I sometimes add more luster to the piece on the second fire. )

OK YOUR TURN! Go, have some fun playing with lusters.......


CLICK HERE to go back to the ON-LINE LESSONS PAGE

CLICK HERE to go back to the PPIO HOME PAGE

*on-line lessons and lesson pages are the property of PPIO and the contributing artists and may not be reproduced for distribution without permission from PPIO


Page design by Marci Blattenberger for Porcelain Painters International Online