|
|
|
|
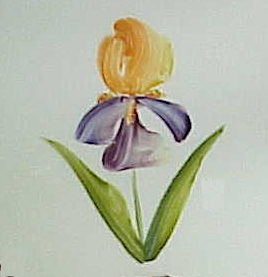
Irises are wonderfully majestic flowers that are great fun to paint in detail with all their frilly edges but I'm going to show you a very quick and simple technique that is my take-off on Nyon brushstrokes. With a little practice, you can turn out small one-fire irises of all sizes using the same brush... |
|
|
THE OILS: To do this technique, you need a
fairly thin oil that will allow you to thin your paints to
an almost inky consistency but you must also take care that
it wont run or spread. I find that pen oil is
ideal for this. There are many different pen oils on the market
and they all seem to work well for this technique. You can
also use anise oil or pine oil. I mix my paints normally with mineral oil to the thickness of toothpaste...then thin with the pen oil on your brush till the paint flows easily.......When loading the brush, wiggle the brush for a good long time in the base color ( don't just dab dab dab it in color...fully charge the brush from tip to ferrule ) and then tip it (load just the tip) in a secondary color..Don't overmix this...Let the stroke do it for you.... this will give a nice natural color variation to the stroke. NOTE: I don't give specific color names . It is difficult to do that with china painting anyway since there is no standardization in color names or color... so I will simply give you the values that I use...Choose colors that appeal to you. THE BRUSH: I use a scroller, the longer the better....and for this particular technique a synthetic bristle works great! Get one that has a nice amount of spring back.... the snap of the brush has a lot to do with the success of this technique... A limp brush wont give you the proper motion and a brush that is too stiff wont let you gracefully swing your strokes into the curves of the strokes.....so , when looking for a brush to do this technique, choose one that is soft but that has some spring or life to it..... |
|
|
|
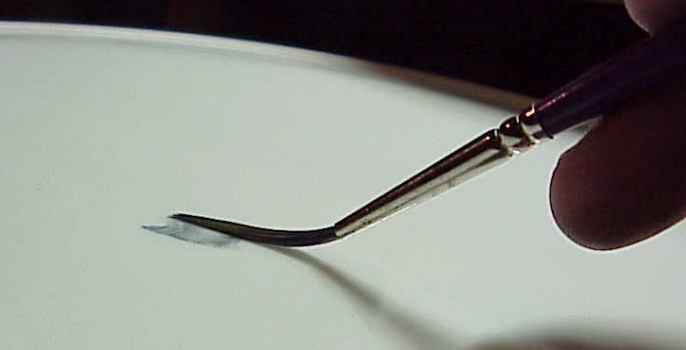
THE BRUSH STROKES: This technique
uses the brush in a different manner. The brush stroke isn't
made by pulling the tip of the brush across the plate but by
laying the brush sideways on the plate and using the width of
the brush , rather than the length of it to make the stroke.....
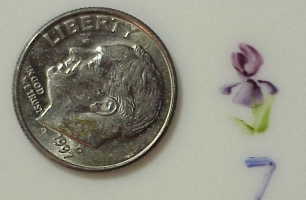
( see the picture below) The width of the stroke is created by varying the pressure on the brush...more pressure means more of the brush touching the china, so the stroke is wider there.... less pressure means less of the brush touching the china... resulting in a narrowing of the stroke. .As you practice handling the brush in this way, vary the pressure on the brush as you make a stroke and you will see the stroke get wider and narrower.....To taper a stroke to a point, lift the brush off the surface of the china at the end of the stroke..like an airplane taking off.....As you vary the pressure on the brush, also practice curving the stroke to the right or the left, making C strokes and reverse C strokes...... It takes a bit of practice to get the brush to behave, but once you master this technique, you can combine the basic strokes Im showing you in this lesson to create any number of tiny Dresden type flowers: roses, daisies, lilies, morning glories, even the fantasy Nyon style flowers.... (There will be more lessons on these various flowers in the future) By varying the pressure on the brush, you can create many different sizes of flowers right down to the tiniest ones ( see the picture at the top of the page with the iris compared to the dime...that iris was done with an inch and a half long scroller... the scroller in the photo below... by using just the tip of the brush) |
 |
|
|
|
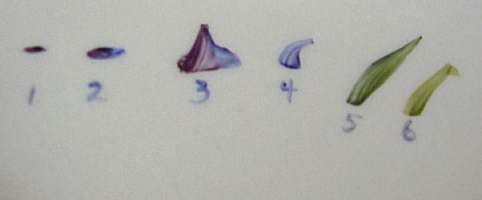
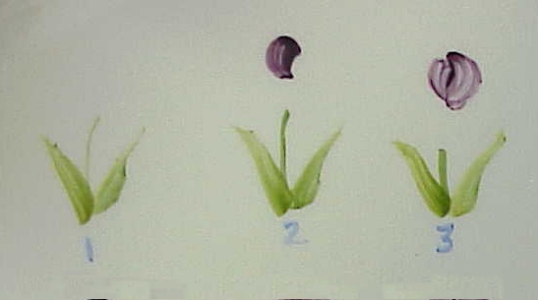
THE BRUSH STROKES:Most of the strokes that I use start with a "seating" stroke that I call the "KITTY BUTT WIGGLE" Visualize a kitty getting ready to jump on something...and think about the way his tail end wiggles back and forth just before he pounces. I want you to do that same little wiggle with the brush as you touch it down to the china to begin some of the strokes. |
|
WHY? Because it gives a nice seat to the stroke and
makes interesting little curls and edges to the stroke...sort of
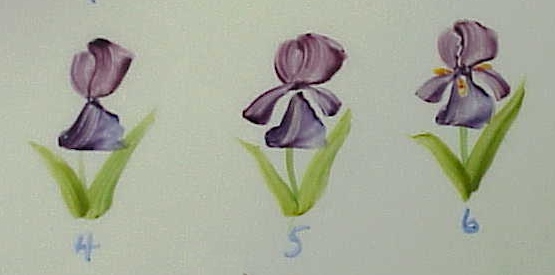
fattens it up, if you will. # 1 shows a stroke where I just laid the brush down on the china....# 2 shows the same move but with a Kitty Butt wiggle....notice how much wider and more interesting that shape is..... # 3 shows one of the main iris strokes which forms the bottom center fall....I lay the brush on the china, kitty butt wiggle to seat it and then push the stroke away from myself while lifting off the pressure on the brush to bring the stroke to a point. ( you can also turn the piece over and pull the stroke toward you if that is more comfortable ) # 4 shows one of the C strokes used to make the bottom side falls....Kitty butt wiggle and then pull the brush around toward the center of the flower in a C curve while lifting off brush pressure at the end of the stroke.....( The other petal is a reverse C...same stroke, just curved in the opposite direction.) The top petals that form the cup are also basically C strokes but you lay a little heavier on the brush so that the strokes are wider. # 5 is a leaf stroke ....Iris have long, narrow leaves and I find that adding a little bit of a curve to them and the stems makes the flower look a little more graceful...This is one of the few strokes I DON'T do the kitty butt wiggle on when I plant the brush.... I start the stroke with a small area of the brush touching the china, then as I pull the stroke out, I press down a little more on the brush to widen the stroke, then ease off again to narrow it at the tip and then finally, lift off the china with the brush to taper it to a point..... # 6 is a variation of the leaf stroke, with the brush plated at the edge of the tip of the completed leaf ( #5) and then pulled quickly toward myself and lifting off, making a little triangular shape that resembles a turn back....This also makes nice thorns............. ALL OF THESE STROKES SHOULD BE PRACTICED UNTIL YOU ARE ABLE TO DO THEM QUICKLY AND WITHOUT HESITATION...THE QUICKER YOU ARE ABLE TO LAY DOWN THESE STROKES, THE MORE INTERESTING VARIATIONS YOU WILL GET IN THE STROKES. |
|
1. stem and leaves: Load the liner with a medium green and make a slightly curved stroke for the stem. Re-load the brush in medium green and tip it in dark green ( I also sometimes load it with light green, pick up a little medium green without mixing it on the brush... just swipe it in the medium green a few times and then tip in the dark green....) |
|
Start at the bottom of the stem. Lay down the brush with
very little pressure and as you pull the leaf away from the stem,
bear down a little more on the brush to widen the stroke...then
as you approach the tip, lighten up on the brush again and at
the very tip, pull the brush off the china like an airplane
taking off......Reload the brush and repeat the stroke on the
other side.... NOTE: If the strokes are not pleasing, wipe them off and start again. The spontanaity of the stroke is the beauty of it. Don't try to rework it...just do it again. ( If the stroke is a little too heavy where the leaves join the stem, you can cut it back with a wipe-out tool) 2. Left Top petal: This is a wide C stroke. Load the brush with a medium color and tip with dark color or load with one color and tip with a second color: I like to use yellow and yellow brown, .....raspberry or American Beauty with a little blue....purple with a little blue...or purple with raspberry...almost anything goes here. Just remember to not mix the colors on your brush. Let the stroke mix them for you.) Start with the left petal just slightly to the left of center...kitty butt wiggle and then pull in a C with enough pressure on the brush to make a pretty wide stroke. 3.Right top petal: Basically the same stroke we just did but curved in the opposite direction : Reload the brush. Start this stroke slightly to the left of center and slightly above the first stroke. Kitty butt wiggle, then pull down and in a reverse C curve with pressure on the brush to make a wide stroke..... You want this stroke to slightly overlap the original stroke. In order to separate these two strokes visually, I often make the first C stroke darker (more of the deeper color) and then reload my brush with a slightly lighter version of the colors for the second stroke. Since these flowers are generally pretty tiny, this gives a little additional depth to the strokes. You can also wipe a small white ruffled area between the two strokes to further separate them.... |
|
4. BOTTOM PETALS The middle fall:
This is the trickiest of all the strokes to do.
Lay the brush down so that the middle of the length of the
brush you are using is in the middle of the stem. ( This sounds confusing. I explain it in more detail a little further down) You are aiming for a basically triangle shaped stroke. Kitty butt wiggle, then pull up and lift off to get the point..Don't curve this stroke. The little curl at the bottom will happen as a result of the kitty butt wiggle. |
|
5. the side falls: Start the stroke
to the left of and slightly below the center of the middle
fall. Kitty butt wiggle, then pull the stroke in a curve
toward the center of the flower, lifting off as you do.
Reload and repeat the reverse curve on the other side. 6. the beard: Wipeout a small stroke at the tip of the middle fall . Paint in with yellow and shade with small dots of yellow brown or orange...paint in small strokes of yellow along the top edge of the side falls and shade with small dots of yellow brown or orange. ( On VERY TINY irises for jewelry pieces, this beard doesn't show up well, so instead I add some of the yellow to a little base for gold mixed with oil and dot that on . This gives it a slightly raised texture also which is attractive.....then dot it with a little of the darker color to shade it...( You can also use enamel or structure) THATS IT! DONE! WITH A LITTLE PRACTICE, YOULL BE TURNING OUT BABY IRISES (IRISISISISISIS ? ) LIKE A PRO! BELOW ARE A FEW CLARIFICATIONS OF THE STROKES INCLUDING DIAGRAMS OF THE STROKE DIRECTIONS....... |
|
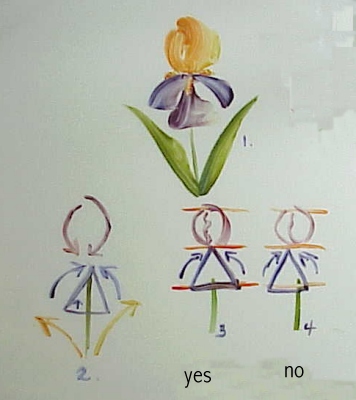
1. shows an iris done with a yellow cup and purple falls.
You can really see the color variations that result from
loading your brush the way I describe and letting the brush
stroke mix the color.( The actual size of this iris is about
a third of the size you are seeing on your monitor) 2. shows the directions of the brushstrokes The stroke begins at the top of the arrow and follows the direction of the arrow. 3. shows the correct way to line up that middle fall.... the center of the triangle should be in the center of the stem 4. shows the incorrect way to line up that middle fall...... The flower will look lopsided if you do it this way. diagrams 3 and 4 also show the proportions of the top and bottom falls. They are approximately the same size so if you imagine dividing the space into 2 parts, it will help you to know where to place the petals..( It helps to sometimes make a small dot at the top, middle and bottom of the space so you can judge where the petals will start and end. |
|
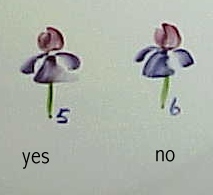
5 and 6 show what happens when you place the middle fall off center....and also what happens if you make the stem too straight. I hope you've enjoyed this lesson..
REMEMBER: PRACTICE is the name of the game here. The
quicker and more confidently you can make these strokes,
the better they will look.
|
|
|
|
CLICK HERE to go back to the ON-LINE LESSONS PAGE CLICK HERE to go back to the PPIO HOME PAGE *on-line lessons and lesson pages are the property of PPIO and the contributing artists and may not be reproduced for distribution without permission from PPIO |
|
|
|
Page design by Marci Blattenberger for Porcelain Painters International Online |