First, of course, you need to select your porcelain. Next clean your porcelain with denatured alcohol. ( do NOT use rubbing alcohol ) This is available at most good house paint ( not art ) stores. Then choose the butterfly ( or butterflies ) you’d like to paint. There are many books on the subject that can serve as inspiration. I find the ones that show illustrations rather than photographs are easier to copy.
Trace the butterflies of your choice onto tracing paper. Using graphite paper ( specially made to burn off completely in the kiln, do NOT use typewriter carbon paper ), transfer your butterflies to the spot(s) you have selected on your porcelain. There’s no need to be exact in every detail of the butterfly, because the transferred image does not remain intact once the wet brush touches it.
Next of course is to mix the paints themselves. In mixing paints for the “European” technique, a closed medium ( one that dries relatively quickly ) is used. Put a small amount of powdered paint on your tile, dip the tip of your palette knife into fat oil ( also known as fat oil of turpentine ) and mix the two.
European fat oil is not as thick as that you find in the USA. If the fat oil you have is thick like honey, it needs to be diluted with pure gum spirits of turpentine to the thickness of thick mineral oil. At this stage the paint should be the consistency of toothpaste, if mixed properly it will feel “sticky” on your palette knife. There is no way I can give you proportions for this, just remember to err on the side of too little fat oil verses too much, as once it has been added there is no way of taking it out.
If you can paint with it at this stage, you have used too much fat oil and your paint can literally fry in the kiln. If this is the case, just add more powdered paint till you reach the right consistency.
Now is the time to add small amounts of aspic ( NOT that jellied stuff you’ve seen in fancy cookbooks! ), until your mixture feels right for painting. If aspic is not available you might try synthetic lavender oil or clove oil. When a light wash of color is desired for a “watercolor” look, more aspic would be added. This look, however is NOT what we want for painting butterflies.
The brush size you use depends mainly on the size of your butterfly, but let’s assume that it is a bit smaller than life size. For this I would use a No.2 sable brush to lay the color and a fine No.00 sable brush for the detail work, ( no square shaders used here ).
Having a different brush for each color helps, but is by no means imperative. You may have to work a little faster with one brush as you are working with a closed medium. The most important thing to remember when painting the wings of a butterfly is the direction of your stroke. Your brush stroke MUST follow the butterfly’s wing.
To help you remember, think about where the wings attach to the butterfly’s body. The direction of your brush stroke should be from the outer edge of the wing in a gentle curve to the center section of the butterfly, known as the thorax. A common mistake is to change direction on the hind wings. If you do this, you will end up with a colorful leaf but nothing that resembles a real butterfly. Ready?
Always start with your lightest color first. Do not consider the small white dots on the Monarch at this point, as they will be “scratched out” later. In the Heraeus colors that I use, I would lay down capucine or brun rouge clair for the orange of the Monarch wing. In the paints that you are familiar with, choose the color in your palette range that most suites your purpose.
We do not worry about the body of the butterfly at this point. We will concentrate first on the wings. With your No.2 brush take up a full load of paint, place it relatively wet ( but NOT too thick ) on the areas that you have marked to indicate the orange part of the butterfly’s wing. Remember to always curve your stroke in the direction of the wing as it enters the body.
Now, place your black ( or black mixed with some brown to soften it a bit ) on the areas around the edges where your pattern indicates, but NOT where the fine black “veins” go. Now, take your (dry) fine No.00 sable ( or equivalent ) and starting in the outermost black area gently drag some black paint through the orange area creating the “veins”. Remember, ALWAYS in the direction of the wing as it attaches to the body. This point may seem redundant, but it is VERY important.
Use your original illustration for the proper “vein” placement. Don’t worry if your brush strokes have overlapped onto the butterfly body area, as these can be cleaned up later. Concentrate on getting the wing to flow into the body. Some people are comfortable doing one wing at a time, others prefer doing one half of the butterfly at one time. Work the way you are most comfortable, remembering that you are working with a closed medium, and that once the paint begins to dry you cannot drag your “veins” through as described above.
Small details, like white spots on the Monarchs’ wing get scratched out with a sharp pointed tool once the paint has dried completely. Be careful, when removing paint this way, to make sure that ALL the tiny specks of paint that you have scratched off are completely removed from your porcelain, otherwise you risk having undesirable spots fired permanently into your finished piece.
If the butterfly you have chosen has small orange spots on it’s yellow wings or black spots on it’s pale blue wings ( for example ), you will have to wait till the paint dries , then scratch out the spots where the other colors go. When these details have been scratched out , you can then add your colored spots. Don’t make the mistake of omitting this step, as a wet color placed on top of a different dry color won’t always give you the desired effect. Also remember that placing too many layers of paint on any one spot can cause the paint to flake off in the kiln, causing irreparable damage.
The wings are painted and they look great! But there is still the body to do. If in painting the wings you overlapped the body area a bit, that’s O.K. To correct this, take a wooden barbecue skewer, or a toothpick, and tightly wrap a small amount of cotton around the pointed end. Lightly dip your skewer into denatured alcohol. Make sure that your “tool” is not dripping with alcohol, as alcohol is used to clean off areas where you do not want paint.
At this point the only place you don’t want paint is on the body area. Carefully clean off the area where the body is to go, in a circular motion, avoiding the wings, of course. The body of the Monarch is mostly black. However, in most butterflies ( if you study them closely ) you will see small amounts of the wing color(s) in the body. It is usually safe ( and desirable ) to mix in some of the wing color with your darker body color.
I first paint the middle section of the butterfly known as the “thorax”. Although the thorax is really three individual sections, what we see is one oval structure. Use a small brush, not overly loaded with paint, to paint the oval thorax. Go back while the paint is still a little wet and wipe out a reflection to indicate the rounded nature of this body part. The head is a small oval attached to the top of the thorax with two very black dots to indicate the compound eyes, one on each side of the head. I use a very fine detail brush with only a tiny amount of paint and a feather light touch to paint the antennae and the feeder tube which looks like two minuscule lines coming out from the head between the antennae.
To paint the abdomen, ( below the thorax ) I use a small brush and I paint in a circular overlapping motion. Starting at the thorax, I paint a small circle. Without lifting my brush I paint another circle just below and overlapping the first a bit, but slightly smaller. I continue in this manner till the abdomen is complete. In this way I effectively wipe out a contour as I continue down the body. This technique allows you to show the (10) sections which make up the abdomen ( the butterflies I paint don’t always have exactly ten sections in their abdomens ) and make your butterfly look much more natural.
Your butterfly seems complete, but look at your illustration once more. Do you see what look
like tiny hairs around the thorax and abdomen? If you do, don’t worry, you’re not to late. As a matter of fact you should wait until your butterfly is dry to add these tiny hairs. With your No.00 detail brush and just a hint of paint GENTLY add tiny hairs where you see them on your illustration.
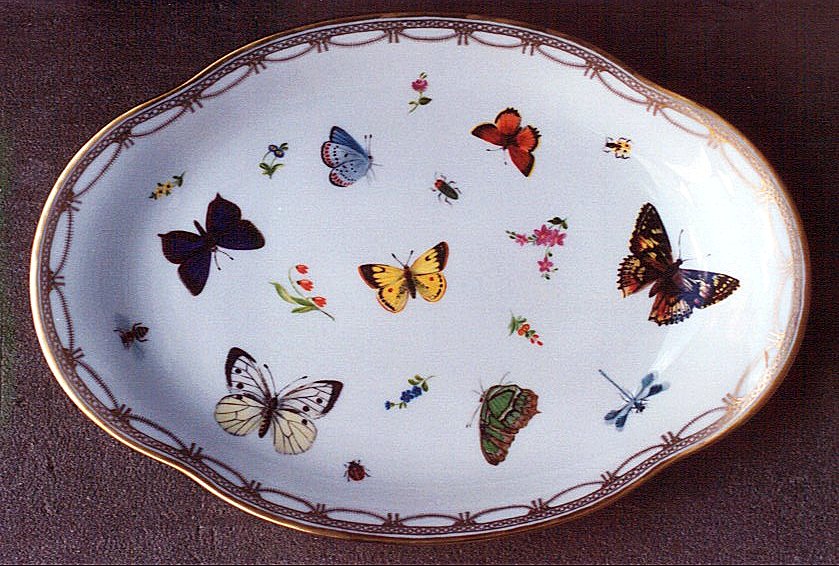
If you choose to create a porcelain piece in the NYON style, at this point you would surround your butterflies with tiny flowers and a gold border ( but that’s a whole new subject ).
HINT
Use a very soft brush ( often cheap dime store brushes work well ) squeezed between your thumb and forefinger, to “fan” out the bristles. Run the fanned out brush as lightly as you can, so that the tip of the brush barely touch your paint, but not the porcelain, over your still wet butterfly ( in the curved direction of the wing as it joins the thorax ). Remembering to go from the outer edge of the wing towards the body. This softens paint areas that may look too harsh, and gives a more natural look to the butterfly.