
by Marianne Carrara I originally began lace draping 10 or so years ago, my sole source of information consisted of a few Vivian Hausle tapes. If you do not have access to a teacher, I highly recommend her teaching tapes/books. She is a guru. They are available from Scott Publishing or you can call Vivian Hausle directly, her phone number is 206/363-2507, she's in Seattle, WA. btw... her phone number is listed on her tapes so I'm sure it's ok to post it here. Other than Vivian's tapes, I'm self-taught. I teach lace draping, have been published a couple times, have been asked to be a contributing artist for one magazine and have won awards. My days of being published ended when they wanted me to mail in the dolls, instead of having layouts done locally. I'm only mentioning this to order to give my qualifications for writing the following. |
|
|
 |
 |
General Information After mixing your porcelain slip, strain it before pouring your molds.
Clean the porcelain greenware using nylon net or an old, worn rubber
scrubber. You can gently scrape the seam off using a sideways motion. After
cleaning the greenware, I run a fairly damp sponge around the pourhole
opening, sealing well. This seals the porcelain and will keep the bottom from
cracking. |
 |
 |
| I clean the bodice and arms at the same time I clean the skirt ... be sure
and put the arms in a safe spot until needed. At this point you can add a hairdo using fur, lambs wool, or cotton. Lambs wool will make long wavy hair. Saturate and add on a little at a time, arranging your hairdo, Or just use the molded hair that came on the form. If you don't add 'hair' be sure and groove in extra lines following the hairstyle line, it will look very natural after painting. I usually add the bodice before draping the skirt. Sometimes
my idea of how I'm going to drape the gown will change, and having the bodice
attached seems to help me visualize the final result.
Any time you attach two pieces of greenware together, always make sure there
is a good vent hole on both pieces. The places you would do this are the
bodice to the skirt and the arms to the shoulders. It doesn't hurt to add a
few vent holes here and there on the skirt. |
|
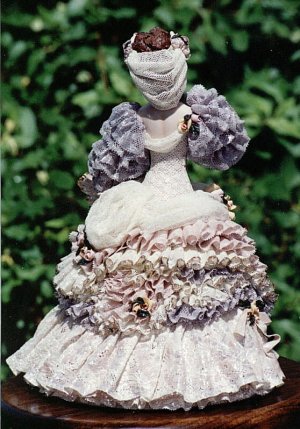
I drape the doll on a clean, well kiln washed shelf, after sprinkling it sparingly with fine sand. The sand acts as little ball bearings, I then place the greenware on top of wax paper. The wax paper will burn away in the firing but allows you to slide the doll around, plus keeps porcelain from dripping on your kiln shelf. If you use an old kiln washed shelf that is rough and has bumps and ridges on the kiln wash, you are taking a chance of the doll catching on one of those ridges during the shrinkage and cracking. Also, make sure the inside of your kiln is clean. You don't want any debris flying around that could imbed itself into your doll.
|
 |
 |
To saturate the lace, instead of dipping it in the porcelain, I use a damp, well squeezed out silk sponge dipped in slip the consistency of cream, then pounce first the wrong side, then turn it over and pounce the right side. Your pouncing motion should make a 'squishing' sound. If you leave heavy imprints of the lace on your table, the slip is too thick. On the same token, if it's a watery imprint, your slip is too thin. If you have put too much water on your lace, just let it dry a bit, then re-pounce with the correct slip consistency. The reason I pounce, rather than dip the lace, is because the shrinkage will be minimal, plus it gives an ironed effect. (There is much more shrinkage when you dip lace.) Pull the lace off the table in a fast motion. This will usually clear all the holes, if you see a few spots that didn't clear, you can lay that area back down and lightly pat it or lay it across the back of your hand and do the same. A good reason to get in the habit of laying your lace right side face down initially is because it will be ready to drape when you pick it up and you won't have to remember which side is the correct side. With net I will either pounce or dip the entire piece in the slip, depending on where I am using the net. There will be shrinkage when dipping but if this is for something like an underskirt, it usually doesn't matter that much. But when you are using net on the dress itself, it's a good idea to pounce the net with a silk sponge instead of dipping. Squeeze out your sponge, turn the lace over and do the same to the reverse side. |
 |
 |
If you are using net for an underskirt your doll looks better if you do a rolled hem before attaching. (This is done just by rolling the wet net back on itself.) Speaking of net, it has a grain. Before cutting your net ,stretch it on both edges to see which side has the stretch. The stretch always goes around the body, or from side to side. If you've ever made a net puff and it didn't do much in the way of puffing, chances are good it was cut out from the wrong direction.
To attach the lace, I drape about a 12" strip loosely over the fingers of one
hand. There is no advantage to using larger pieces, this size works pretty
well in not drying out before adding. |
 |
 |
| If your lace is beginning to dry on your hand before you have finished,
LIGHTLY spray ... hand, lace and all with your fine mist squirt bottle (a
travel size hair spray bottle works well). If your hand has dried porcelain
on it, you are pulling the porcelain off your lace while you are holding it.
If I am doing gathered rows of lace, I like to add a a scant row of coarse net under each row before draping, just a little smaller than the top lace. This will give the lace shape and keep it from going flat in the firing. I do this in addition to using coarse net as the underslip. I do not do this if I am pleating the lace on. If you are using black porcelain to drape your doll, be sure and always keep the slip well stirred and at the same consistency throughout the process. If there is variation, you could possibly end up with different colored streaks of black, which won't be noticeable until after the doll is fired. |
Your underskirt and the bottom of your lace should BARELY clear the bottom of the greenware skirt, keeping it completely even all the way around. You should not be able to look at the doll and see your base or see an uneven (short/long) skirt length. But if you make the bottom edge down all the way flush to your work surface, chances are the bottom lace will break as you set it down after firing. If you think your base might show a little, add 3-4 coats of watery slip around the bottom in your dress color. This will give an illusion of lace and it won't be so noticeable.
Now if you are adding a train on the back, it, of course, will be flush to the surface. But even then, you want to cover up the outside edge by pleating on a row of lace. I like to use flannel for trains instead of muslin because it's much sturdier and a lot of weight from the lace and slip will be resting on it. To add a train to your skirt, dip a piece of flannel in slip, lay it flat on the table to smooth it, then gather it on. You don't have to be concerned so much with neatness in the attaching because it will be covered. I usually will add at least two layers of flannel in this manner, the second one above the first and a little longer than the previous piece. You can add as many layers as you like until you reach the desired fullness, but on the last piece fold in a little hem so you won't have a cut edge showing.
So far I've been lucky in finding cotton net to use for my underslips. In my humble opinion, the net is the best thing to use because it has a see through effect (even though you can't actually see though it) and doesn't give a solid appearance under your lace. Because of it's sturdiness, coarse net is better than the fine net for underskirts. If you can't find any net, you can use a cut up, closely woven, THIN cotton tablecloth for your underskirt. As a matter of fact, it's always best to use as thin as possible cotton when draping a doll. The heavier the material, the thicker your doll will look. The exceptions would be for things like coats, jackets, hoods, places you'd use crocheted items, or the times you'd use flannel.
Speaking of coats, an old, thin terry towel makes a nice coat, you can pick at the little threads (while it's damp) to make it look like velvet. You can add small pieces of cut up wool and fluff it up to make it look like fur around the edges. If you are adding 'fur,' I've found it's easier to dip it in a colored porcelain slip, then add it, rather than trying to China paint it afterwards. It's almost impossible to get complete coverage.
I don't go back and recoat the lace after I drape it on the doll, if I do anything at all, it will be just to touch up the edges. But if you absolutely have to move a piece that has already dried, spray it lightly with water, then gently move it. In that case, I will go back and re-coat. You have a narrow window of how long you have to move your lace or net around. Once it has begun to set up, leave it alone. This is why many beginners have burn outs, they pick at it too long at this point.
Use cotton or a 90% cotton blend. The only time I would say, with trepidation, it was OK (but not really) to use a synthetic would be if you were sandwiching a piece of synthetic onto a piece of flannel or sheeting. The flannel/sheeting would then give it some backing strength. But if you should do that, go back and recoat your synthetic. Remember, slip will soak into cotton or any other natural fabric, but will only lay ON TOP of synthetic. Using synthetic is never a good idea, but if you have no choice, this is the safest way to do it.
Don't introduce too many different types of patterned lace on your doll. It's not really noticeable if the lace is different sizes, and that is just something that's done, but it's very noticeable if you are using the same size lace, with different patterns, one row on top of another. This is OK if you are making something special for added interest as an accent, but not recommended if you are building a plain doll with roll upon row of lace. If you only have enough of the same size lace, with different patterns, to make your doll, then do either something to vary the size (such as cutting one down a bit) or do several rows with one pattern, then finish up with the other. A doll always looks nice if you add a little something that's different. Such as add a little pleating somewhere if you are basically draping it with gathers. Or vise versa. Or throw in a pouf over a row of lace, allowing only some of the lace to show under it.
I put the arms on after I have completed the bodice, except, of course, for the sleeves. After cleaning the arm, I lay the fingers, right side up, against one of my fingers, then gently saw them apart. Then take a soft little damp brush and clean the seam lines between the fingers. You don't want to saw down flush on the fingers, saw at an angle, when you reach the bottom on the front side, there will be more thickness on the inside. Just leave that, it won't show and will give more strength to the fingers. I use APT-II when I add on the arms, I know this isn't absolutely necessary, but it just seems to create a better bond to me. If you have a heavy arm for a larger doll and you are concerned about it holding or partially dropping, you can also saturate a tiny piece of cotton from a cotton ball, and sandwich that between your shoulder and arm, use APT-II in your slip, plus coat each connecting piece with APT-II, then cover everything with a little piece of net or lace. After all that, that arm isn't going anywhere. You can change the shape of the fingers by sawing them apart as soon as they are firm enough to hold after taking them out of the mold. Then take a damp brush and gently pounce them to go in different directions. You can change the angle of your arm by cutting the spare off at different angles (which would dictate the angle of the arm) or by cutting the arm completely apart at the elbow, then filling in the changed angle with cotton from cotton balls. If you do this, you need to reinforce the cut elbow by wrapping it in net. A long sleeve that you can't see through is now recommended. You can also change the direction of the doll head by cutting it off soon after taking it out of the mold, set it in the position you'd like, then plug the open areas with very thick slip. Sand to smooth after it dries. Speaking of cutting apart, you can change the shape of your wet greenware skirt by cutting it down, slashing across the bottom, then putting it back together with slip. Add a piece of muslin or flannel over your cut edges for added strength.
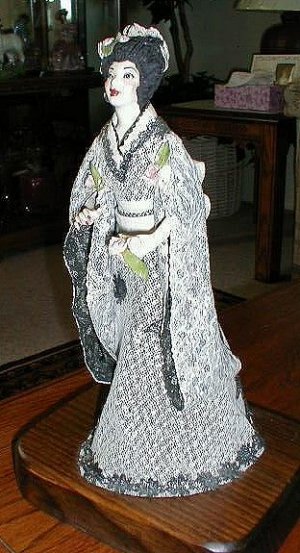
I cut out all my bows, hats, ribbons, etc., from treated flannel material. (And this I know I learned from Vivian Hausle's videos.) Buy cheap, non- fire retardant flannel. You do not want a heavy weight. Have a bowl of thin slip ready, dip your entire piece of flannel into the bowl, making sure it's completely saturated. Squeeze, pull and in general get out as much porcelain as you can. Lay this out on several sheets of newspaper, print only, no colored pages. Lay several sheets on top, then 'iron' the paper with your hands, getting out all the moisture. Flip the papers over and peel off the backside newspapers. Take a dampen sponge with a little slip and go over your flannel. At this point it'll look like a mess, but it does get better. Cover with fresh newspaper. Flip to the other side and repeat the process. Usually you do this about 3 times to each side. You stop when the flannel looks like a piece of chamois skin. Put this in a damp towel until your ready to cut out your item. You can also put it in a sealable plastic bag and it will keep for a while in your refrigerator. If it does begin to dry, you can make it pliable by spraying it. Flannel treated this way can be used for so many things ... collars, cumberbuns, purses, bows, hats, coats, etc., etc. It shapes fairly easily, and can also be used to make Oriental dresses. Be sure and recoat with thinned slip after it's reached the leatherhard stage, this will prevent it cracking in the firing. You can treat muslin in the same manner, it will be easier to work with, but it's also thinner so won't be as strong. Rather than looking like chamois skin, muslin is ready to use when it loses it's shine. Either material will work for making the extras. If you are making a wide brimmed hat out of either method, it's a good idea to tuck in some lace underneath, on the hair, to act as a prop.
If you are using a colored slip, you can paint your greenware skirt with 3-4-5 very thin coats of slip before draping. Usually this isn't necessary, depending on what you are doing to it, but if you are using rows of lace and are concerned that at a certain angle the base might show through, it's a good camouflage technique. Painting on several thin coats of slip also works really well on the bodice or arms. You can coat the greenware with one color and then lay on a piece of lace using a different color. It makes a nice color combo look without any work. Stroking on 3-4 coats of thinned slip is also how you make gloves.
(for information on how to make colored slip, read down a little further in this article) If you are using different colors of porcelain on a dress, lay a piece of handi-wrap ( plastic cling wrap) or something similar, over your first color of lace ... then drape over that using your new color. If will save worrying about smudges or drips. After it's had a few minutes to set up, gently pull out your handi-wrap.
To handle the doll after the bisque firing, pick it straight up by the head, then quickly hold it by the pour hole. If that is not possible because of a veil or hat, pick it up by the arms. This is also how you handle a doll after all firings are completed. If you have to pick up a small doll to move it to a kiln shelf for the bisque firing, you would (carefully)! pick it straight up by the head (only)! having your hand ready to instantly support it from the bottom. You might also want to use something like a spatula to help get it started. I would never try this on a large heavy doll, it might work, but you might also snap off it's head.
Lace should always be glazed to give it strength. Use a spray gun using about 40 lbs. of pressure. Only one thin coat is needed. If you put glaze on too thick it can cause burnout's. Wash off any glaze that gets on the skin areas. Or if you prefer, cover up these areas with tissue before glazing. It's almost impossible to brush glaze on and get an even coverage and you will work yourself to death trying not to fill up the lace/net holes. Glaze can be fired to many temps and it's usually recommend you fire to a Cone 2. (Never fire a lace draped glazed doll hotter than a Cone 3.) I don't do the glaze firing to a Cone 2 anymore, mostly to save wear and tear on my kiln. I generally fire to a Cone 03. The difference is the glaze fires INTO the piece at a hotter firing but sets on top with the lower ranges. I know that supposedly if you do not fire to a Cone 2, and do not use a glaze from the manufacturer of your porcelain, you are taking a chance on incompatibility and the glaze crazing. But I have never had any problems using whatever clear glaze I've had on hand and I've certainly never had any crazing on the lace. After your glaze firing, sand the face and arms with a piece of fine sand paper. This only takes a second. China paint your features and fingernails, using the same color for the lips, nails and blush. Adding a MOP (Mother of Pearl) type of luster on the dress is a nice touch.
Sometimes I want a whiter white than the comes in a slip jar. When this happens I add either Duncan's EZ-Stroke white or Duncan's Covercoat white underglaze. Using the Covercoat is cheaper and seems to make a whiter slip but it does take away somewhat from the translucently. This is OK for lace draping but is not advised for normal porcelain pieces.
To get different colors, it's OK to mix slips from the same manufacturer, but don't mix different brands. Each manufacturer has their own formulas, and if you mix, you could very well end up with a disaster.
You can add white Kleenex (don't use colored) under something puffy to help hold it's shape. It will burn away in the firing.
If you'd rather not China paint your many little flowers and leaves, make your own flower/leaf clay. Use colored porcelain or you can color your white porcelain with EZ-Strokes that will high fire. Another way to make flower clay is to save your mold trimmings in a glass jar, mix with plasticizer and use that. (Never put trimmings back in your slip.) Flower clay is made with a 2:1 ratio with plasticizer, with plasticizer being the '1' and your slip being the '2.' (This of course can vary, follow the directions for your particular brand.) Plasticizer should be sold where you buy your porcelain slip. If they don't carry it, you can buy it from Colorific Porcelain. Pour your flower mixture on a plaster batten or mold and let it set up until fairly firm. Give it a good kneading then put it in a jar. It will be easier to work if you give it at least a day to age before using. When you are using clay, put a little baby oil on your fingers. This will help keep the clay from sticking to you. You can also make flower clay using APT-II. The way you do it is as follows: 1) Thicken slip by adding 1-2 teaspoons of APT-II per cup of slip. Mix thoroughly and place in an airtight container (zip-lock bag) for about a day to age and plasticize. 2) Remove and place on newspaper or a plaster batten to remove the excess water. After this, it's ready to use. Your flower will dry like greenware instead of regular clay. It has excellent strength and very little stress breakage.
You can color white slip by using EZ-Strokes. You can also use Mason Stains. Be careful about breathing in the Mason Stain dust if you use it. Once I used it to color a gallon of slip and didn't use a breathing mask. ( And I did know better ) The next day at work I had a heck of a time with my memory and reasoning ability. Thank goodness the effect wore off after only one day, but I'll NEVER do that again. All in all, I find it much easier, and less expensive, to just buy colored porcelain.
If you are a little concerned about your flowers not holding well to your dress and shifting in the firing, you can pat on a little clear glaze over your slip when attaching. Since I've started doing this, I've never had a leaf or flower move. Actually, I've not had any flowers move, but I have had leaves decide to pull a little away. I've also used the glaze without any added slip and it's worked fine. But that has been only for sticking in a leaf here and there. The reason I started doing that is sometimes I'd be using colored clay that was not the color of my slip, so rather than taking a chance of say, black slip showing on a green leaf, I just anchored it in with the clear glaze. It worked fine. Oh, and wet porcelain will not stick to dry porcelain, so make sure both areas are dampened.
You can use any natural fabric or substance to add interest. On hats I've used everything from pieces of sea wool sponges to moss to tiny pieces of (uncooked) chicken bone. Just experiment. You can make feathers from building up small pieces (about 1/4") of wool, then fluff out your 'feathers.' The more you do to a doll, the prettier it is. Look around in craft areas, there are many things made out of natural materials that can cut up and used for decorations.
If you are adding on fairly thick medallions or appliqués, soak them first over night in thinned slip. When you are ready to add them to your piece, take them out and press them between your fingers. This serves two purposes, it will bring back the definition and push the slip completely through the add-on. If done this way, you don't have to worry about any burnouts. If you are using medium to thin appliqués, all you need to do is soak them a little in slip, then do as described above. Never dip any thing like this in slip, then lay it on the table. The slip will pull right off the back.
Porcelain is very abrasive, be sure and take off all jewelry. I have a diamond living somewhere on a doll.
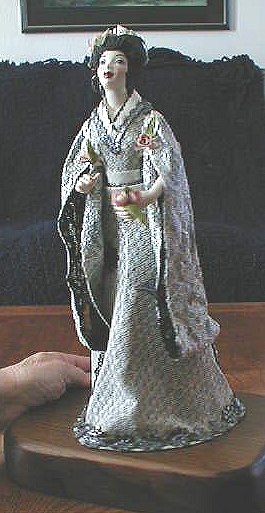
Mink Brown porcelain makes a good skin tone for a Hawaiian doll. Ivory make a lovely Oriental skin tone.
If you are using the 12" seated Alberta doll mold with the tall narrow chair back, here's how to attach it on without using gobs of slip. Dampen both pieces with clean water and rub together, you are working up friction. You'll probably have to dampen both sides several times while rubbing, before they become tacky. As soon as it grabs well, quit rubbing the pieces together and gently press it in. Seal the chair on with matching slip. Use a 10" post to prop against the back, painting on a coat of flint where the post and chair touches. You can also attach arms this way.
You don't have to use only lace to make a pretty doll. You can use an old petticoat, pillowslip or old fancy blouse to make a pretty summer dress. Check with your Goodwill type of stores.
A library is a good source for researching sketches of actual period dresses. Most were beautiful but many were outrageous. One thing I found out is that you can't do anything to a gown, no matter how flamboyant, that will compare to what those ladies actually did. Once they got past making the ball gown as fancy as possible, they did elaborate decorations to the decorations. They competed with each other and did some really horrible things in their quest to have the 'best' gown ... such as sewing on dead whole rodents, insects, birds and small animal heads. Colorful species of birds were killed almost to local extinction.
Everyone probably knows this, but just in case... it's something I remembered
today. Cotton ... pulled away from a roll ... is great for sculpting to
build up designs for cats, dogs, rabbits, on a porcelain piece.
I received an email asking me where to buy the old (Alberta) Jamor-Mallory lace draping molds. I knew Colorific Porcelain had something to do with them but wasn't sure what, so I called. They directed me to Shiloh Molds. Also, try the Colorific Porcelain site Colorific Porcelain Home page http://www.colorificporcelain.com
Marianne Carrara |