TIGER FUN IN AN AQUARIUM
Adapted from "Tiger Fun in an Aquarium" Step-by-Step
on Betty's Web Site
If you're returning to this lesson and have already read the Intro and earlier
fires on the tiger, you can click below to go straight to a specific fire.
The Paint Plan For The Tiger Fun in an Aquarium Painting
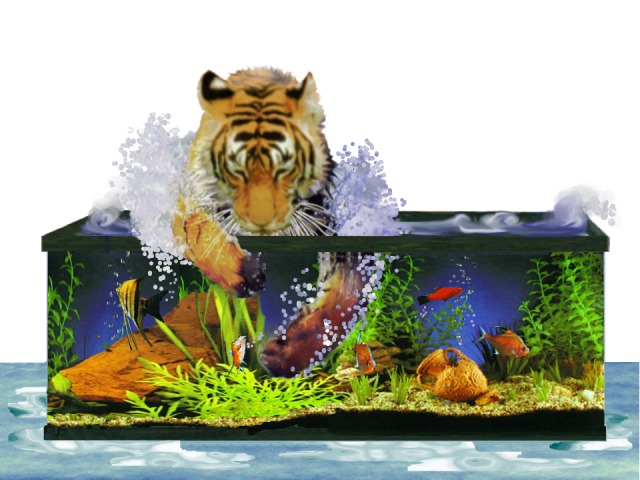
This painting depicts a tiger playing in a large aquarium. (Similar
to the cat in the fishbowl theme). I used Corel Photopaint Version 7
to plan my painting on the computer. I scanned various pictures into
files to use in composing my aquarium scene. If you have CorelDraw, Photoshop,
or a similar art editing program, you may be able to use the program to plan
the layout of many of your paintings.
To begin with, I took a picture of an empty 10 gallon aquarium and
"stretched" it to a size approximizing about a 40 gallon. I had
originally used the 10 gallon size in an earlier plan, but it looked out of place with the
large tiger. Then I found some pictures of aquarium water and foliage and
"pasted" parts in to set up the aquarium. Next I "pasted"
various fish to swim in the aquarium.
I originally had a photo of a tiger coming face on, but he did not look appropriate.
Someone, seeing the original aquarium scene I had done, with the 10 gallon aquarium
and the tiger coming at you head on, said it looked like he had "stumbled" into
the aquarium. And well it did. I changed the face to use a tiger looking
down, as though peering into the aquarium. I kept the same paws position, but the
first version had both paws inside the aquarium. After I thought about it, it seemed that,
if he had both paws playing in the aquarium, then he had no way of holding himself up.
So I changed it so that one paw was hanging over the edge of the aquarium,
supporting him and the other was "fishing" through the aquarium water. I
wasn’t sure how well a 40 gallon tank could hold up a 500-700 pound tiger.
Some friends told me that if you accepted the fantasy of a tiger in an aquarium, then you
could probably accept him leaning on a 40 gallon aquarium tank.
When I was satisfied with my picture plan, I printed it on 720 DPI quality paper.
This produces good resolution and color. To get the size I wanted, I split
the original picture in two halves and made a file for each side. I printed both
picture files and taped them together to get the larger complete picture.
The lesson for this painting is quite long. The painting took 10 fires and
this lesson contains very detailed steps for each fire. If you intend to try a painting, following the lessons steps, you might want to do it in "sessions". You can either print out the whole lesson and use it as a guide, offline, or come back at different intervals to get more information. I used a size 12"x17"
porcelain tile for my "tigerfun" painting.
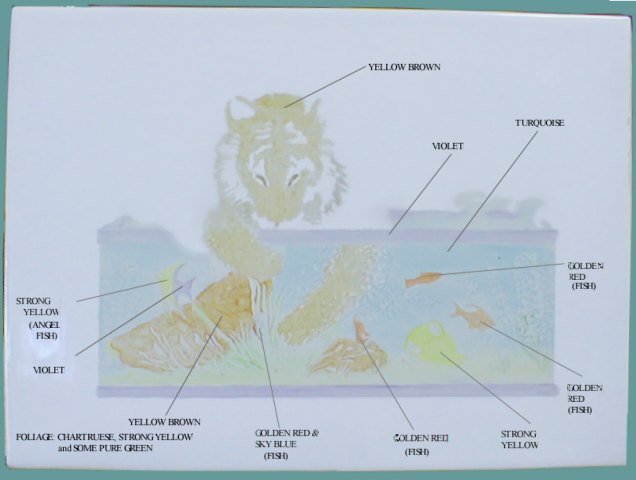
Click here to see the picture plan for
the painting
(Image Size: 84K)
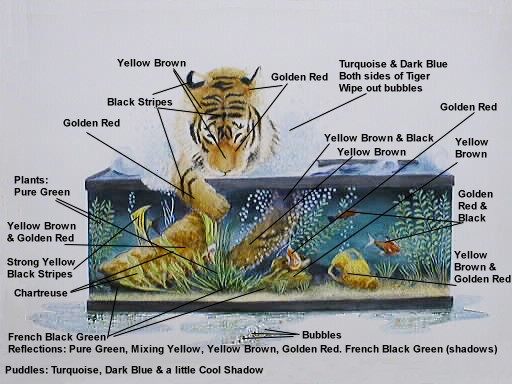
You will notice that this painting plan contains very "vivid" colors for
china painting. Although my final painted colors are darker and the water leans
more toward turquoise than blue, I think I was able to get the deep colors I desired.
Return to Top of Tiger Fun in an Aquarium Page
CLICK HERE to go
back to the ON-LINE LESSONS PAGE
Colors Used:
(individual colors are indicated on the photos for each fire.
These photos are accessible from a link at the end of the instructions for each
firing.)
| |
|
|
| Yellow Brown |
Dark Blue |
French Black Green |
| Mixing Yellow |
Turquoise |
Hair Brown |
| Strong Yellow |
Sky Blue |
Rich Brown |
| Transparency |
Baby Blue |
|
| Golden Red |
Cool Shadow |
|
| Crimson Purple |
Pure Green |
|
| Violet |
Chartreuse |
|
| White (or "stringing" enamel or structure paste) |
Although the above colors are what I used on the painting I did, you do not
necessarily have to go out and buy a lot of new colors if you don't have some
of these. Feel free to substitute like colors. The Golden Red is a rich orangy
red, similar to blood red, but a little milder color. For the Turquoise, which
is probably the color I used the most, you can use an actual Turquoise or any
blue green color. Transparency is a very pale yellow, leaning towards a Yellow
brown. It is mainly used in portrait colors. The one I have is a Jayne Houston
product, but I am sure you can get it at other dealers too.
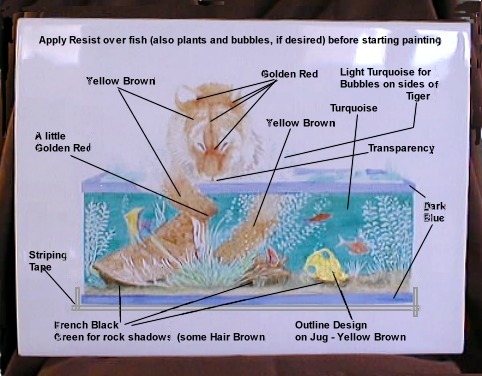
First Fire
- Using clear mylar acetate and carbon paper, trace the basic design onto
the tile, not too many details.
I used "Always Open", which as the name indicates is an open
medium. I am a slow painter. You are not restricted to an open medium
if you feel you can get the painting for the first fire down before the
medium starts to dry the paint. I just prefer the slower drying open medium.
- Use a turquoise blue for the aquarium water areas. The turquoise
is used as a base color on the first fire, even though the aquarium water
actually looks dark blue. The initial application of turquoise should
give the water more brilliance in the finished painting.
- There are two ways you can keep the fish and plants in the aquarium clear
of the turquoise paint. This applies to this fire and all subsequent fires
where the water color is re-applied. You can apply resist over the fish and
plants BEFORE you paint the water with turquoise. Or, you can paint the water
with turquoise and then wipe out the areas where the fish and plants are.
It seems that either using resist or wiping out after painting seem to be
6 of one or one half dozen of the other as far as difficulty. Either
method is very time-consuming for this particular type of painting where there
are so many objects which need to be kept from being covered by the water.
The advantage of the resist is, you can see the objects you are covering,
so you probably get a cleaner line. When you paint and then wipe out
it is sometimes hard to see what to wipe out when everything is so covered
with the blue paint of the water. For this first fire, since painting over
the fish, that are just traced onto the tile in graphic, might smear the drawing,
it is probably best to apply resist over the fish and plants that you don't
want covered by the water color. You may be able to get by without resisting
the rocks and the parts of the tiger paw that are in the water, if you can
smoothly go around them with the water. If not, resist them too.
- After you have applied the water color, you are ready to paint the various
aquarium fish, plants, rocks and tiger. Pull up the resist to uncover the
fish and plants (an any rocks or tiger parts you might have resisted) so paint
can be applied to them.
- Use Golden Red for the red-toned fish and Violet and Strong Yellow on the
angel fish.
If you make some color mistakes on some of the aquarium fish, don't let
it upset you. I did this in my painting, with the red fish, which actually
had a light blue tail. Just improvise.
You can use"whink" (hydrochloric acid), to remove any color,
but I don't like to use Whink, except in extreme emergencies. If
not used carefully, it can do a painting in, removing the porcelain glaze,
along with any paint it removes. Also, it is an acid, so dangerous
to use if not handled carefully.
- Paint the large and smaller aquarium rocks with Yellow-Brown. Leave
some parts of the rock a lighter tint for highlights. Just apply the
paint and then, use a Stipple brush over the painted rock, to create the roughness
of the rocks, coming back to smooth it in some areas. If you don't have a
stipple brush and you paint furry animals or mottled areas, you should try
to get one. They are great for creating a textured look. A lot
of the textured look of the hillside in my "Tiger face in a Waterfall"
painting (on my personal web page) was achieved by means of stippling.
- For the orange parts of the tiger face and paws, use Yellow Brown.
Again, use the Stipple brush on these areas to create the "fur look".
Come back and smooth it as necessary.
- For the aquarium plants, use Chartreuse, yellow and Pure Green, with a little
yellow for the sand area. You do not need to define this bottom area
sharply at this fire. Just wipe out several areas of plants (if not
resisted) that will later be green and also create some little "sprigs"
by using a small tipped wipe out tool and both the wedge-shaped end and pointed
end of the larger wipeout tool. These type of tools are also very handy.
- Using the pointed end of the larger wipeout tool, wipe out some of the bubbles
in the water and over the tiger. The small wipeout tool can be used
to create the smaller bubbles. It is very important to get these in
on the First Fire, as you cannot come back and make already painted areas
white or lighter after they have been fired. In subsequent firings,
you can wipe out more bubbles over the turquoise paint for not-quite-white
bubbles.
- Now paint the aquarium frame with violet. I never use pure black
alone to show a black color. Painting with a violet, dark blue or brown
on the first fire helps to avoid it having a "flat black" look.
Which underlying color you use depends on your taste and the subject
matter. I suggest the violet for the aquarium frame because it seems
that the metal would have some "purplish" tone. You probably
could just as easily select a blue undertone. We will applying other
colors to the frame in subsequent firings, not using the black paint until
the fourth fire.
- That’s it for the First Fire. Fire the tile at 016 F. (I think
that is about 825 Centigrade)
Please note that the photo of this first fire has picked up an overall bluish
tint. I suppose this is due to the lighting it was photographed in.
I have tried to adjust some of the blue tint out, but could not get it all out,
fearing I might corrupt some of the other colors.
Click here to see the First Fire
painting.
(Image Size: 73K)
Second Fire
- Apply car striping tape (right on top of the violet color on the top frame
on the aquarium). This will allow you to more easily get a straighter edge
where the water meets the frame. Apply car striping tape along both
sides of the aquarium on the blank tile and along the bottom edge of the aquarium
frame (not on top of the violet color of the frame this time, but on the blank
tile along the area below the frame) to keep an even line while painting in
these areas. Paint the aquarium water areas with turquoise blue again.
You want to be sure and get a strong turquoise base before you paint
the dark blue in the water. Again, you can either resist the fish and plants,
etc. or paint over them and wipe them out afterward.
- If you use the resist, be sure and remove it before painting the various
aquarium fish again. Again, use Golden Red for the red-toned fish and violet
and Strong Yellow on the angel fish. When I did this painting, I put
some white on the tail of the red fish which was supposed to have a light
blue tail. I seldom use white, since it generally does not cover other
colors the way oils and acrylic paints do, but I wanted to see if I could
define the tail of this fish, which I had accidentally colored red in the
first fire. I though that I might be able to come back in a later fire
with a lighter color. When this was fired, I had a happy surprise .
The white I applied seemed to "eat up" the red that was under
it, so the tail was light enough that I was able to use the light blue color
on it. I'm not sure why this happened, unless the white had some yellow
in it. (some yellows will lighten some reds). For the
light area on the small fish in the middle of the aquarium, use sky blue,
with a little violet on the fin.
- Using violet on a very small brush, define the eyes on the various fish,
using the small wipeout tool when necessary.
- Apply Yellow Brown again for the orange parts of the tiger face and paws,
not applying too much color. And again, use the Stipple brush to texture
the tiger's fur, then come back and smooth it just a little.
- Paint more Chartreuse on the aquarium plants slightly left of center in
the front of the rocks. Where necessary, wipe out the other plants.
- Apply Mixing Yellow to the little jug on the right side of the aquarium.
- Using the tip of the larger wipeout tool, refine the bubbles in the water
and over the tiger.
- Paint the bottom pebbles with Yellow Brown and a small amount of Hair Brown.
You can create a "pebbly" look by "stamping" this
painted area with the small tip of the large wipeout tool.
- Now pull up the striping tape that was applied over the top frame of the
aquarium, and add more violet on all parts of the aquarium frame. Then
remove the striping tape applied to keep the definition of the bottom frame.
- That's all for the Second Fire. Fire again at 016.
I have again marked the colors I used on the picture of the second
fire. For some reason, this time the tile photographed smaller. I
can't imagine why, since I used the same camera. It is a Olympus Digital Camera.
And, the overall bluish tint is not quite as strong, but there is some graying
(It is a white tile, by the way).
Click here to see the Second Fire
painting.
(Image Size: 43K)
Return to Top of Tiger Fun in an Aquarium Page
CLICK HERE to go
back to the ON-LINE LESSONS PAGE
Third Fire
- This fire you may want to use resist for all of the fish, most plants and
bubbles. You want to put a stron application of turquoise this time (probably
the last application of turquoise for the water), and you may not be able
to see the plants and bubbles under the new application of paint.
Apply car striping tape again, this time just to the bottom edge of the
frame and each end of the bottom frame, to try and keep the straight edge.
- After the Resist has dried, apply a generous amount of Turquoise in the
water portion. (though not so much that the paint might bubble or "pop"
in the kiln. You probably do not need to resist the large rocks and
jug, as they are large enough to avoid with the turquoise.
- Apply a little more Yellow Brown to the Tiger face, making sure to define
the tip of the nose. Then apply Golden Red in front of the ears, to
the creases down the forehead and to define the darkened area over the nose.
Carefully shape the "frown" of concentration between the eyes
with this same Golden Red.
- Apply a little Golden Red in the shadow areas of the paws. Use the
Stipple brush, where you feel it was necessary to soften the strokes on the
fur.
- A little Transparency can be used to shape the tiger's mouth under the nose
- Using a very light application of Turquoise, shape a few bubbles on either
side of the tiger's face. Use the point of the large wipeout tool to wipe
out some of this color to define the bubbles.
- Next, outline a preliminary design on the little jug with Yellow Brown.
- Using French Black Green, create some shadows under the rocks and the jug,
adding a little Hair Brown along with the French Black Green to soften some
of the shadowing.
- Now pull up the Resist. Getting the bubblesmay be a little tricky. Using
a needle tip will help with this task. Be carefull when you lift the little
circles of resist from the bubbles, that you don't smear the paint of the
water.
- Where necessary, wipe out any rock areas and larger straight plants which
may have been covered by the turquoise.
- Now paint the aquarium frame with Dark Blue. This application of
these other colors, before painting it black will give the frame more "life".
- I pulled up the striping tape.
- That's it for the Third Fire. Fire again 016.
I have again marked the colors I used on the picture of this fire. Remember all
of the colors are a little less blue than shown here. (The Turquoise has a greener tint).
Click here to see the Third Fire
painting.
(Image Size: 61K)
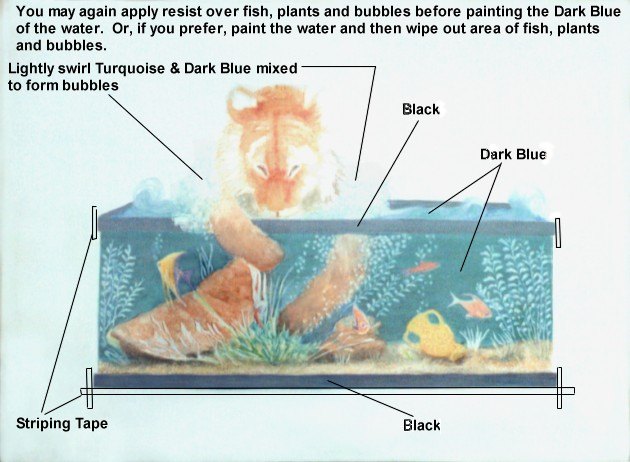
Fourth Fire
- Now its time to paint the Dark Blue on the water. If some of the
paint covers parts of the fish, plants and bubbles, you can come back and
wipe out those areas.
- Or, you can apply resist again to the fish, plants, etc. before painting
the water with the Dark Blue. Use whatever method works best for you.
- It is important, whether the resist or wipe out method is used, that no
hard line is formed between the left arm of the tiger (the one in the water)
and the water area. The area between this arm and the water near the
top of the aquarium should be softened. It will later be darkened (but
probably not as black as indicated in the source picture shown on this page.
The black in the upper aquarium area is a little too strong.
- You may find, as your firings progress, that many of the plants are varegated
in color because they were wiped out in different areas each time you painted.
This happened with my painting. Wiping out, when there is so much application
of paint, can also cause a build-up of the paint.
- Now you can paint a layer of black on the bottom and top rim of the aquarium.
Again use the striping tape to mask off the edge of the rim for a smooth
clean line.
- Using a mixture of Dark Blue and Turquoise, go over the frothy bubbles on
either side of the tiger's face. Then use the point of the large wipeout
tool again to re-form these bubbles.
- Now pull up the striping tape.
- And that is it for the Third Fire.
- When I painted this tiger, I was only painting on it one evening a week,
because at the time, I was limited to the time I had to work on it.
If you are painting this or a similar painting, and have more time to spend
for each fire, there is no reason you could not combine some of the procedures
defined here.
- For instance: You might be able to apply more color to the plants and fish,
thus bringing up their color faster than is the case in this painting.
- This would mean that the painting would probably by finished in fewer fires
than was the case with this painting.
- Fire the tile again at 016.
Click here to see the Fourth Fire
painting.
This time, I forgot to borrow the digital that I have been using for photographing the
fires of this painting, so I had to use my regular Canon camera. The coloring is a
little different than what I was getting with the digital. It seems a little duller
than the actual painting really is. I think the next fire, which was photographed
with the digital camera, inside the studio, with additional lighting, looks better.
Return to Top of Tiger Fun in an Aquarium Page
CLICK HERE to go
back to the ON-LINE LESSONS PAGE
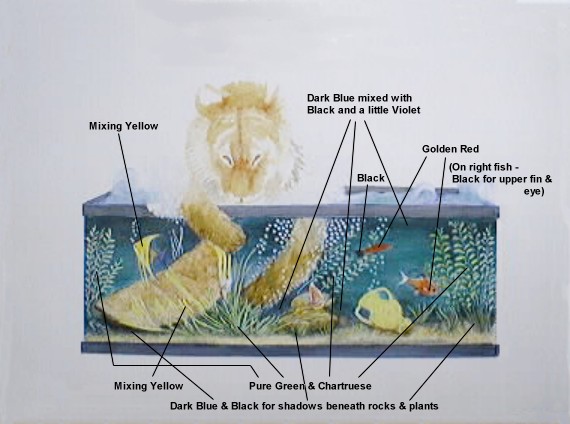
Fifth Fire
- Using Dark Blue, mixed with Black and a little Violet, paint in the shadow
areas of the water, including some of the shadows behind the plants.
Leave areas of light in the middle of the aquarium water. If some of the paint
covers parts of the fish, plants and bubbles, just wipe out those areas.
- After wiping out the plants, fish and bubbles, (if necessary) paint the
plants light and middle green, using Pure Green and Chartruese. Use Mixing
Yellow on a few of the plants.
- Paint some shadow beneath the rocks and around the lower portions of some
of the plants, using Dark Blue and Black.
- Add some Mixing Yellow on the light striped areas of the Angel Fish. Paint
the body of the red fish, in the upper right area of the aquarium, with Golden
Red. Paint its tail black. The red fish with the white tail on the
lower right side of the aquarium can be painted with Golden Red. Paint its
dorsal fin Black and add Black to the eye.
- And that is it for the Fifth Fire.
- Fire again at 016.
Click here to see the Fifth Fire
painting.
(Image Size: 54K)
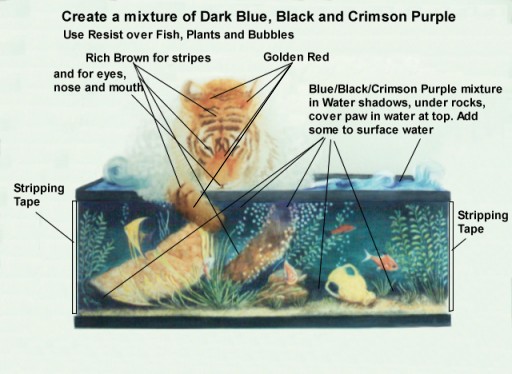
Sixth Fire
- As before, you may use the resist again to mask the fish, plants and bubbles
before painting the water.
- Apply stripping tape to the sides of the aquarium so you could paint the
water in the aquarium more freely.
- Create a mixture of dark blue, Black and Crimson Purple. Use this paint
mixture in the shadow areas of the water near the top of the aquarium, behind
the plants, under the rocks and across the top of the tiger's paw which is
in the water, in the area just below the frame of the aquarium. Again,
leave areas of light in the middle of the aquarium water.
- Paint the stripes on the face and paws of the tiger, using Rich Brown.
Darken the eyes, also with Rich Brown. Use a little of the Rich Brown
to create some shadow on the paw of the tiger which is outside the aquarium
and to define the tip of the nose and mouth area.
- Using Golden Red, paint in the reddish areas of the face and add a little
of the Golden Red to the outside paw.
- Remove the stripping tape and, if used, all of the Resist.
- And that is it for the Sixth Fire.
- Fire at 016.
Click here to see the Sixth Fire
painting.
(Image Size: 54K)
This fire was photographed with the Canon AE1 35MM camera. The lighting
is better this time than the last time I used the Canon.
Return to Top of Tiger Fun in an Aquarium Page
CLICK HERE to go
back to the ON-LINE LESSONS PAGE
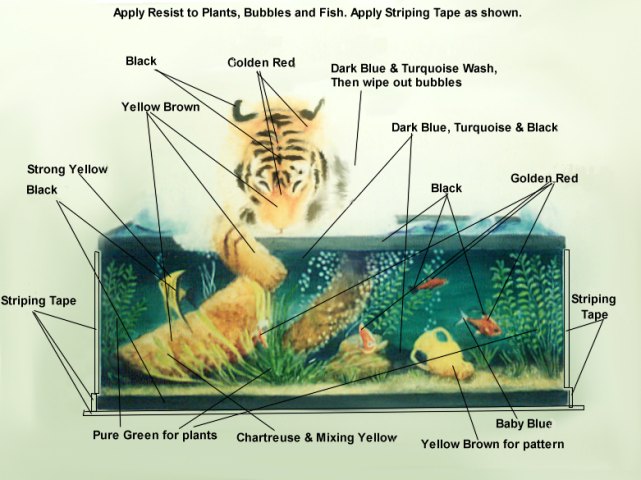
Seventh Fire
- If desired, you may again use the resist to mask the fish, plants and bubbles
before painting the water. Only the shadow areas of the water will
be painted this fire.
- Apply stripping tape to the sides of the aquarium to allow you to paint
the water in the aquarium more freely. Add tape to the bottom of the
aquarium frame too, so you can more easily add more black to the frame.
- Mixing the Turquoise, Dark Blue and Black, again go over the shadow areas
of the water near the top of the aquarium, behind the plants, under the rocks
and across the top of the tiger's paw which is in the water, in the area just
below the frame of the aquarium. Continue to make sure there are still
areas of light in the middle of the aquarium water.
- Paint the stripes on the face and paws of the tiger again, this time using
Black. Go over all dark areas of the tiger (which you painted with
Rich Brown in the last fire) with Black. Add some more Yellow Brown
for the tiger fur.
- Add some more Golden Red, as in previous paintings, to areas of the tiger
face and paws.
- Add a light wash of Dark Blue and Turquoise in the bubbles area on each
side of the tiger, wiping out the bubbles with the wipeout tool.
- Remove any Resist you may have used and add some Golden Red to the red parts
of the fish. Re-emphasize the details on the fish, using mostly Black,
but paint the light tail of the red fish with Baby Blue. Add more Strong
Yellow and some Black for stripes on the Angel Fish. Add Pure Green
to the plants, using a little Mixing Yellow and Chartruese on the plants in
front of the large rock.
- Paint some Yellow Brown on the large rock. Add some Yellow Brown
to the design on the little jug in the water (This does not show up well on
the photo).
- Add more shadow on the gravel under the rocks and between some of the plants,
using French Black Green, and Hair Brown in some areas.
- Paint the aquarium frame areas with Black.
- Next, remove the stripping tape.
- And that is it for the Seventh Fire.
- Fire at 016.
Click here to see the Seventh Fire
painting.
(Image Size: 54K)
This fire was again photographed with the Canon AE1 35MM camera.
Return to Top of Tiger Fun in an Aquarium Page
CLICK HERE to go
back to the ON-LINE LESSONS PAGE
Eighth Fire
- We are finally through with the aquarium water and can now concentrate on
other details and touches for strengthening the painting.
- Add more Yellow Brown on the tiger's face and outside paw to deepen the
color. Also more Golden Red in some areas of the face and along the
side of the paw. Shape the tip of the tiger's nose with a little Black.
- Use some Black mixed with a little Yellow Brown to deepen the shadow on
the upper part of the paw which is in the water. Paint more Black over
the tiger stripes on the face and paws.
- Add more Yellow Brown and Golden Red to the large wedge-shaped rock and
Yellow Brown to the smaller rock in the middle of the aquarium. Give
the aquarium plants another application of Pure Green and Chartruese, depending
on whether they are light or darker. Use some French Black Green near
the base of some of the plants. Used the French Black Green in the shadows
between the plants and under the rocks too.
- Add Yellow Brown and Golden Red to the little jug to define its roundness.
- Give all ofthe aquarium fish another application of the same colors which
were previously applied, with care taken to define the lines on each one.
Try to be sure and leave any highlights on the fish.
- The foam on either side of the Tiger's head should be further defined and
darkened with Dark Blue and Turquoise. Then wipe out some of the bubbles
with the rounded point of the larger wipeout tool.
- Using a mixture of Turquoise, Dark Blue and a little Cool Shadow, create
the puddles of spilled water around the base of the aquarium. After
the shapes of the puddles are painted, go over those areas in vertical strokes
of various colors which might be reflected from the aquarium. For these
reflections you can randomly paint Pure Green, Mixing Yellow, Yellow Brown
and Golden Red and a little French Black Green. The decision for where
to paint a particular color can be made by looking at the area of the aquarium
above that puddle section and trying to paint in colors likely to be reflected
there. After you paint these vertical strokes of color here and there,
lightly brush through them with several thin horizontal and curved strokes.
To do this, use a brush which, although it may have some oil, has no paint
color. This should result in a "soft wipeout" in the water
where each stroke is made, simulating small ripples in the puddles.
- In the middle puddle, create a few bubbles, by using Turquoise and Dark
Blue to make rounded shapes and then wiping out highlights. The lower
edges of the bubbles can be kept straight to create half-cylinders, as though
they were floating on the top of the puddles. Create them in different
sizes with some grouped together, creating about 4 or 5 bubbles in all.
- Use French Black Green in the puddles near the base of the aquarium frame
for shadows.
- And that is it for the Eighth Fire.
- Fire at 016.
Click here to see the Eighth Fire
painting.
(Image Size: 62K)
This fire was photographed with the digital camera.
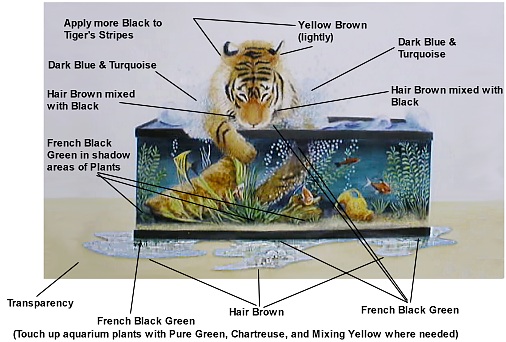
Ninth Fire
- Using Transparency, lay in the color for the table or surface on which the
aquarium is resting.
- Paint Hair brown around the lower edges of the puddles to indicate shadows.
- Paint French Black Green across the upper part of the tiger's paw which
is dipping into the water, to further deepen the shadow area there.
You don't need to stay right on the paw, but just brush across and smooth
the edges to blend with the rest of the water. Any bubbles which are
covered by this painting should be wiped out afterward.
- Using French Black Green, create shadows in the water under the chin of
the tiger. More shadows can be indicated by painting a little Hair
Brown, mixed with Black on either side of the mouth and nose area (against
his ruff).
- Add a little more Yellow Brown around the upper ruff and outside ears area
to further define these against the background.
- Touch up the aquarium plants here and there, where needed with Pure Green,
Chartreuse and Mixing Yellow.
- Add more Dark Blue and Turquoise to the foam on either side of the Tiger's
head. Again, wipe out some of the bubbles with the rounded point of
the larger wipeout tool.
- Apply more French Black Green to the puddles near the base of the aquarium
frame to further deepen these shadows.
- Paint more Black over the already black stripes on all parts of the tiger.
- Shadow areas in the plants can be further deepened with French Black Green.
- And that is it for the Ninth Fire.
- Fire at 016.
Click here to see the Ninth Fire
painting.
(Image Size: 76K)
This fire was photographed with the digital camera.
Return to Top of Tiger Fun in an Aquarium Page
CLICK HERE to go
back to the ON-LINE LESSONS PAGE
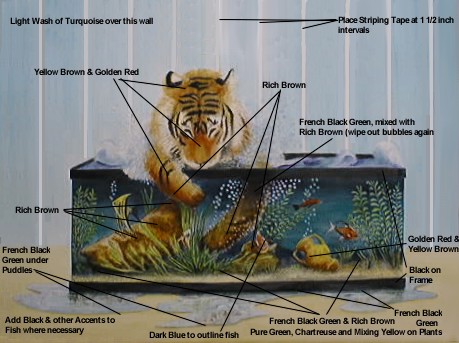
Tenth Fire
- Paint Rich Brown in the shadow areas of the large rock, especially under
the tiger's paw.
- Pure Green, Chartreuse, and Mixing Yellow should be applied, where necessary
on the plants.
- Apply more Yellow Brown and Golden Red to the tiger's face and paws to deepen
this color.
- Apply Rich Brown to round out and create shadowing on the tiger's paws.
- More French Black Green (mixed with Rich Brown) should be painted on the
upper shadow of the tiger's paw in the water. (Be sure and wipe out bubbles
afterward)
- Add more Golden Red and Yellow Brown to the little jug to further round
out its shape.
- In the shadow areas, under rocks and between the bottoms of plants, apply
French Black Green and Rich Brown.
- Add a little Dark Blue around the center fish (by the smaller rock) to define
its shape. Then add Black and other accents of color, where necessary to define
the different fish.
- Some Rich Brown can be added to define the shadow areas on the smaller rock.
- Paint more Black on the aquarium frame to darken it.
- Use a little French Black Green under the puddles, here and there to darken
these shadow areas.
- Add more French Black Green where the puddles meet the base of the aquarium.
- For the wall behind the tiger, to simulate wallpaper, place strips of 1/8
inch striping tape, vertically, at 1 1/2 inch intervals on the background
white of the painting.
- Then paint a light Turquoise wash (using vertical brush strokes) over the
white area, behind the tiger, which is not covered by the tape. Be careful
to keep the area around the tiger's head and bubbles on each side defined
but not too sharp to where it will look unnatural.
- Now, remove the striping tape.
- And that's all for the 10th Fire.
- Fire to cone 16.
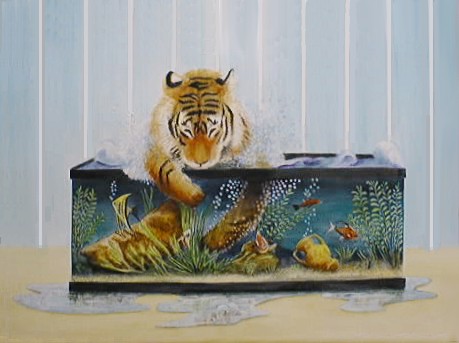
This should be your last fire, except for painting on the whiskers and signing
the piece. I used Rose Seivert's (Rosebud Perfection Paints) white paint
for the whiskers on the tiger. Rose's catalog, featuring her paints, is on this
PPIO web site. You can find her in the drop-down listing of Catalogs on the
PPIO home page at http://www.porcelainpainters.com. You can also use any enamel
or structure paste that will "string" for the whiskers, if you like.
Click here to see the Tenth
Fire painting.
(Image Size: 52K)
Click here to see the Finished Painting
Return to Top of Tiger Fun in an Aquarium Page
*on-line lessons and lesson pages are the property of PPIO and the contributing artists and may not be reproduced for distribution without permission
from PPIO
|