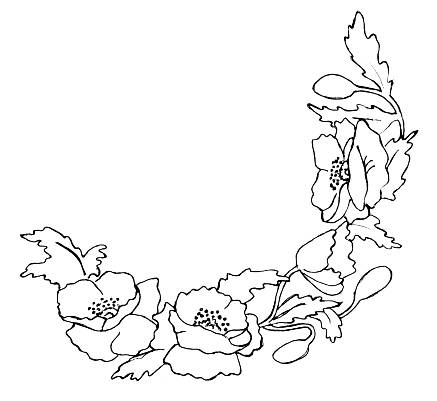
Line Drawing
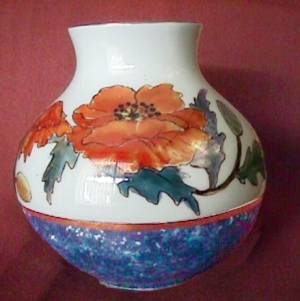
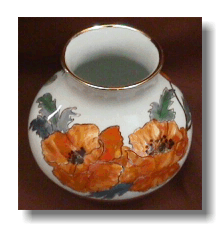
Photo of vase showing
"crackle" texture on base
of the vase.
First Fire:
- You may either trace the line drawing pattern provided for this lesson,
or better, use it as a guide to do your own free hand drawing of the
poppies design.
- First, using a banding wheel, or by measuring about 2 inches from
the bottom of the vase, draw a straight line around the vase. The distance
from the base of the vase to this dividing line will vary, depending
on the size of the vase you have selected. The one shown in the illustrations
is about 5 inches tall. For flowers the size that are on that vase,
you will need about 2 1/2 inches of vertical space so the line for that
vase would be drawn about 2 � 2 � inches from the base of the vase.
- You can use the Stabilo or Sharpie pen to draw the line. (All, or
at least most, of the pen lines will disappear in the firing).
- Next, take the Auto Striping tape and apply it around the vase, following
the line. Apply the tape so the bottom edge follows the line you have
drawn around the vase. As you apply the tape, stretch it so that it
follows the curve of the vase. If you get the type of tape that has
some stretch and flexibility, this is easier to do.
- Now apply the poppies design to the vase.
- If tracing:
Print the line drawing of the poppies on your printer (you may need to resize it a little larger).
Tape a section of the Matt Acetate paper to the design and trace with your pen or pencil. If you are comfortable with a stylus, you can use that to trace the design. I have problems using the stylus as I prefer to see the pen mark of the design when I trace.
Then tape the acetate paper with the design around the vase. You may need to cut up the design to make it wrap around. On each section of the acetate, tape with masking tape in three places. Slip a piece of the graphite paper under the acetate, keeping the tracing in place with the tape. You may need to move the tape around to facilitate getting the graphite in all areas. Do this with all sections of the tracing until the full design is on the vase.
- If drawing free hand:
If needed as a guide, print the line drawing of the poppies on your printer.
Using the Stabilo or Sharpie pen, draw the design around the top area of the vase above the Auto Striping tape band. Feel free to embellish the design with your own creativity.
- Now, using the quill pen and the Brown Luster paint, follow the outline
of the flowers and leaves.
- After you have outlined all of the flowers and leaves with the Brown
luster, you are ready to apply luster to the base of the vase.
- The penwork on the flowers should dry pretty rapidly, but still handle
the vase carefully while applying the paint to the lower part of the
vase. Paint the area below the tape with the Blue luster (or whatever
color you have selected to go with the poppies). After you have covered
the whole lower area, and while the paint is still wet, crumple the
piece of grocery bag plastic into a ball, and hit it against the wet
paint. Keep doing this all around the base of the vase until the paint
begins to dry. It will start making a "smacking" sound as
it gets tacky. This should create a variegated pattern of lights and
darks on the base of the vase in the blue paint.
- After the blue pattern of paint is dry, pull up the Auto striping tape and fire the vase at cone 018
Second Fire:
- Apply the Pumpkin or orange color luster to the flowers, inside of
the outline. Stroke with the brush in the direction of the petals, either
from the outside in or the inside out. Don't paint "across"
the petals. Your strokes are very likely to show up after the firing,
so its best they follow the natural lines of the petals. Be careful
not to let the paint "puddle" as this buildup may flake off
in the fire, leaving areas of bare white porcelain. If desired, you
can use a little "dry brush" stroke on some of the petals,
for variety and interest. This is done by dipping your brush into the
source of your color (saucer or bottle) and then blotting some of the
paint off, so that your brush strokes kind of "scratch" the
surface of the porcelain, leaving some white porcelain showing.
- Apply the green paint to the inside of the poppy leaves outline, careful
of puddling with these also. Try to paint the length of the leaves,
rather than across them.
- If the crackle design on the lower area of the vase looks okay, you
need do nothing more with it. Sometimes the application of the crumpled
plastic will leave deeper layers of luster which may flake off. You
can cover these with some of the Blue or dark luster, thinned with Luster
thinner or Luster Essence. Pour a little of the color into a small dish
and add a drop or two of the thinner or Essence, not too much. Then
just paint over the Blue part.
- Another nice effect (which I did with the vase in the illustration)
is to apply a layer of Mother of Pearl Luster all over the Blue color
on the base.
- Don't apply the Blue color and the Mother of Pearl in the same fire
though. If you want to apply both, apply the blue in this fire and the
Mother of Pearl in the Third Fire.
- Fire the vase again at cone 018.
Third Fire:
- If the flowers look all right, you are done with them. If you think
they need more depth, you can add some more of the Pumpkin or orange
to the petals and maybe some Sapphire to the leaves. Don't paint all
over the former color. Just add more color in some areas for a little
deeper color.
- If you painted blue on the base of the vase in the Second Fire and
want to add an application of Mother of Pearl, you can do that now.
- If you are not adding any luster color in this fire, you can apply
the Liquid Bright Gold now. Otherwise, it can be applied in the Fourth
Fire.
Liquid Bright Gold application:
- Apply a length of the Auto Striping tape all around the vase, letting
the upper edge of the tape come to just below the edge of the blue on
the base of the vase. Apply the tape so that it is completely in the
blue, closely following the division between white porcelain and the
blue crackle design.
- Next, apply a second band of the striping tape, directly above the
first band and right against the top edge of that band. Do not overlap
the strips and be careful that there is no space between the two edges.
- Last, apply a third band of the striping tape, directly above the
second band and right against the top edge of that band. Here also be
careful not to overlap the tape nor leave space between the two edges.
- Now, remove the middle strip of tape all around the vase. This is
the area you will paint with the Liquid Bright Gold.
- Apply the Liquid Bright Gold to the area between the two remaining
tapes, being careful not to get the gold outside of the taped area.
- When the gold is dry, you can pull up the remaining strips of tape.
- Last, a finger edge of Liquid Bright Gold can be applied to the top
edge of the vase. You can either use your finger for this or the side
edge of a brush which has been dipped into the Liquid Bright Gold.
- Fire to cone 018.
Your vase is done.
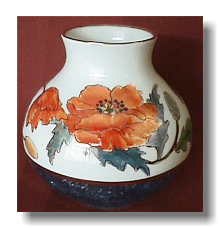
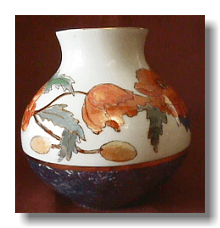
Three Views of the Finished Vase