|
APPLES
by Ann Cline |
|
| Because of
lack of time and vision problems, I don't do much painting any
longer so I have taken the photos from my book, "Berries & Fruit,
My Way". Hope this is a help to anyone wishing to paint this
glorious fruit.
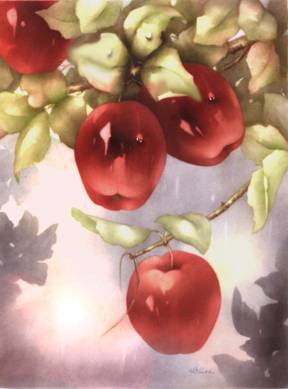
Apples are rather easy but I would suggest that you paint them at a time when you are feeling bold and willing to give this boldness to your painting by using the depth of color and range of values that it deserves. I have used this boldness on the center of interest and, to a lesser extent, those apples nearby. Less detail and a lesser range of values is used on apples that are further away. BEFORE BEGINNING the lesson using the color photos, please scroll down and study the black and white photo and the helpful hints. I have placed arrows on the black & white photo to show various aspects of painting the apples. Also, studying an image in black and white lets you see the various values without being influenced by the color. |
|
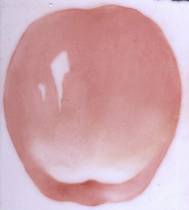 |
(On almost all other subjects I paint the background on the first fire at the same time as the subject matter. However, when painting fruit, I like to be able to "carve" around them and get a shape that pleases me without having to worry about disturbing the background.) With a plan in mind and being careful not to have the apples forming a line of any kind, paint the shapes you desire. If you "carve" around the edges, be sure not to leave a build-up of paint. (Pulling outward rather than going around the apples will help eliminate this.) Be mindful of perspective and don't show the top of an apple that is hanging from an upper branch or vice versa. For the apple shown here, lightly wipe out the bottom curve on the front of the apple and wipe out the "window", and a sparkle or two. (See black and white photo and helpful hints.) If you are going to have overlapping leaves or stems, you will need to wipe out these areas before firing. |
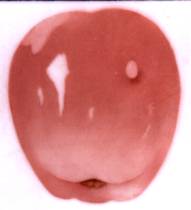 |
More color was added over the entire apple and an interesting highlight (upper left) was wiped out. The "window" was cleaned out and more "sparkles" were wiped out. A soft reflected light was wiped out (lower right). Brown was added to the blossom end (behind the front curve) and some highlights were wiped out of this. The front curve was NOT cleaned out again in order for it to not appear too much lighter than the apple. |
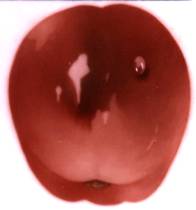 |
A heavy wash coat was applied overall and a darker red was added to create some interesting shapes that add character and interest. A wee bit of black was added to this red next to the "window" in order to emphasize it. (Exaggerated values, texture and shadows on the center of interest can lend excitement to a painting.) |
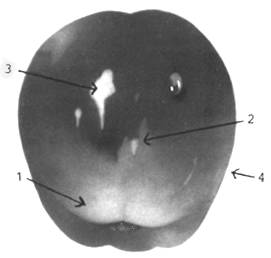 |
BLACK & WHITE ILLUSTRATION: Arrow #1 shows the most difficult part of painting an apple. Don't curve upward too soon as this will make the curve look unconnected with the rest of the apple. The outer ends of the curve should flow toward the curve of the apple, itself. After all, and keep this in mind, these "bulges" on the end or top of an apple actually do curve out and become the large round curve of the apple shape. Also, notice that they MUST fade out as they become part of the the larger curve. Arrow #2 shows interesting shadows and variations in the skin of an apple which are essential for an interesting painting. Arrow #3 shows strong light hitting the shiny apple skin. Arrow #4 indicates reflected
light and gives a feeling of a convex or rounded appearance. |
HELPFUL HINTS
|
|
|
COMPLETED PIECES: Click on the thumbnails below to see a completed apples painting on two porcelain pieces:
|
|
|
Painting on Tile |
Painting
on Coupe Plate

|
| CLOSING:
It doesn't do much good to list colors as they will look different on different computers and different monitors. However, for the record, I used French Pompadour and Ann's Deep Red and Black. On the last fire, I gave the entire apples a rather heavy wash coat of Raspberry Pink to give the apples a more rosy appearance and soften the red. I have not included any instructions for the dewdrop so as not to make this lesson too long. Perhaps I will give a dewdrop lesson at a later time. Have fun. Ann |
|
|
|
|
|
CLICK HEREto go
back to the ON-LINE LESSONS PAGE
|
|
|
CLICK HERE to go back to the PPIO HOMEPAGE |
|
|
*on-line lessons and lesson pages are the property of PPIO and the contributing artists and may not be reproduced for distribution without permission from PPIO Page design by Betty Gerstner for Porcelain Painters International Online |
|